Java collection framework

The Java Collections Framework  (JCF) provides many important classes and interfaces to collect and organize group of alike objects.which helps in storing and processing the data efficiently.JDK 1.2 introduces a new framework for collections of objects, called the Java Collections Framework.   This framework has several useful classes which have tons of useful functions which makes a programmer task super easy.

Hierarchy of Collection Framework


List -Interfaces

The List interface extends Collection and declares the behavior of a collection that stores a sequence of elements.A List is an ordered Collection . Lists may contain duplicate elements. A list collection stores elements by insertion order (either at the end or at a specific position in the list).A list can store objects of any types. Primitive types are automatically converted to corresponding wrapper types, e.g. integer numbers are converted to Integer objects.The List is the base interface for all list types, and there  implementation class are ArrayList , LinkedList  and vector .

Set-Interfaces

A set is a Interface that does not contain duplicate values. In provides three general purpose implementations in Java like  HashSet, TreeSet, and LinkedHashSet.

Map-Interfaces

A map contains values based on the key i.e. key and value pair.Each pair is known as an entry.Map contains only unique elements.. A map cannot contain duplicate keys. There are three main implementations of Map interfaces: HashMap, TreeMap, and LinkedHashMap.

Lifecycle of a maven project

Default maven lifecycle contains 7 phases that is described below:

  • validate – Validate phase check the project is correct or not and also check all necessary information that is required for build is available or not.
  • compile – Compile phase compile the source code of the project.
  • test – Test phase the compiled source code using a suitable unit testing framework. These tests should not require the code be packaged or deployed.
  • package – Package phase take the compiled code and package it in its distributable format, such as a JAR or WAR.
  • verify – Verify phase run any checks on results of integration tests to ensure quality criteria are met
  • install – Install phase install the package into the local repository that is use as a dependency in other projects locally.
  • deploy – Deploy phase done in the build environment, copies the final package to the remote repository for sharing with other developers and projects.

Difference between “mvn clean package” and “mvn clean install” ?

mvn clean package : Package command does below thing

  1. Validate :- Validate the project is correct and all necessary information is available or not .
  2. Compile :- Compile your source code of the project.
  3. Test(optional) :- Test the compiled source code using a suitable unit testing framework. These tests should not require the code be packaged or deployed.
  4. Package :- Take the compiled code and package it as a jar or war as per pom file and move into target folder.

So when you run the command mvn package, it runs the commands for all lifecycle phases till package.

mvn clean install: Install command does below thing:

  1. Validate :- Validate the project is correct and all necessary information is available or not .
  2. Compile :- Compile your source code of the project.
  3. Test(optional) :- Test the compiled source code using a suitable unit testing framework. These tests should not require the code be packaged or deployed.
  4. Package :- Take the compiled code and package it as a jar or war as per pom file and move into  target folder.
  5. verify – Run any checks on results of integration tests to ensure quality criteria are met.
  6. install – Install the package into the local repository, for use as a dependency in other projects locally.
  7. deploy – Done in the build environment, copies the final package to the remote repository for sharing with other developers and projects.

So when you run command mvn install, it runs the commands for all lifecycle phases till install, which includes package as well. So you can say , install phase comes after package phase.

  • mvn package command will compile source code and also package it as a jar or war as per pom file and put it  into the target folder(by default).
  • mvn install command will compile and package, but it will also put the package in your local repository. So that other projects can refer to it and grab it from your local repository.

Difference Between @JoinColumn and @JoinTable in hibernate

  • @JoinTable stores the id of  both the entity into a separate table wheres @JoinColumn stores id of the another entity in a new column in  same table.
  • Use @JoinColumn when the entities have direct relationship i.e a foreign key between two entity.
  • Use @JoinTable when you manage the relationship between entities in another table.
  • @JoinTable : Use this when  you need a more normalized database. ie. to reduce redundancy.
  • @JoinColumn : Use this for better performance as it does not need to join extra table.

Difference between SessionFactory.openSession() and SessionFactory.getCurrentSession() in hibernate.

Both getCurrentSession() and openSession() are method of SessionFactory.

openSession() Method

  • It always creates a new Session object.
  • Programmer need to explicitly flush and close session objects.
  • openSession() is slower than getCurrentSession() in single threaded environment.
  • You do not need to configure any property to call this method.

getCurrentSession() Method

  • It creates a new Session iff there is no any session in current hibernate context.
  • Programmer do not need to flush and close session objects, it will be taken care by Hibernate internally.
  • In single threaded environment it is faster than openSession().
  • You need to configure additional property in hibernate.cfg.xml file <property name=”hibernate.current_session_context_class”>thread</property> otherwise it will throw an exception.

Java Comparable example

  1. Comparable interface is present in java.lang package .
  2. Its contains only one method compareTo(Object).It is used to compare the current object with the specified object. 
    Comparable.java
    public interface Comparable<T>
    {
        public int compareTo(T o);
    }
  3. You can sort the elements on the basis of single data member only.
  4. Using Comparable interface, we can sort the elements of:
    • String objects.
    • Wrapper class objects, for example Long, Integer etc.
    • User defined custom objects.
  5. Comparable interface defines a natural ordering of elements.

Example : Sort student object based on student name , if student name is same then sort on basic of  student phone.

class Student implements Comparable<Student>{
    private int student_id;
    private String student_name;
    private String student_phone;
    @Override
    public int compareTo(Student student){
        int flag= this.student_name.compareTo(student.student_name);
        return falg== 0 ? this.student_phone.compareTo(other.student_phone) : flag;
    }
}

How do I upload a file with metadata using a REST web service?

You have three choices:

  1. Base64 encode the file, at the expense of increasing the data size by around 33%, and add processing overhead in both the server and the client for encoding/decoding.
  2. Send the file first in a multipart/form-data POST, and return an ID to the client. The client then sends the metadata with the ID, and the server re-associates the file and the metadata.
  3. Send the metadata first, and return an ID to the client. The client then sends the file with the ID, and the server re-associates the file and the metadata.

How to Ignore Empty and Null Fields using Jackson .

  •  Jackson provides Include.NON_NULL to ignore fields with Null values and Include.NON_EMPTY to ignore fields with Empty values.
  • By default Jackson does not ignore Null and Empty fields while writing JSON.
  • We can configure Include.NON_NULL and Include.NON_EMPTY at property level as well as at class level using @JsonInclude annotation.
  • To configure Include.NON_NULL and Include.NON_EMPTY globally for every class we need to do it at ObjectMapper level by using its  setSerializationInclusion() method.
  • Use Include.NON_NULL and Include.NON_EMPTY at property level with @JsonInclude annotation
  • Use ObjectMapper to ignore Null and Empty fields globally.
  • Include.NON_NULindicates that only properties with not null values will be included in JSON.
  • Include.NON_EMPTY Indicates that only properties that are not empty will be included in JSON. Non-empty can have different meaning for different objects such as List with size zero will be considered as empty. In case of Map to check empty isEmpty() will be considered as empty.

1. Using Include.NON_EMPTY and Include.NON_NULL at Property level

Find below example.

public class Student{
    @JsonInclude(Include.NON_NULL)		
    private String name;
    @JsonInclude(Include.NON_EMPTY)	
    private String phone;
    ------
    ------
}

If  value of name is null then it will not be included while writing JSON for student object. same like if value of phone is empty then it will not be included while writing JSON for student object.

2. Using Include.NON_NULL and Include.NON_EMPTY at Class level

Find below example for Include.NON_NULL at class level.

@JsonInclude(Include.NON_NULL)
public class student{
  ------
}

Using Include.NON_NULL at class level means any property of this class having null value will not be included in JSON.
find below example for Include.NON_EMPTY at class level.

@JsonInclude(Include.NON_EMPTY)	
public class Student{
  ------
}

Using Include.NON_EMPTY at class level means any property of this class having empty value will not be included in JSON.

3. Using Include.NON_NULL and Include.NON_EMPTY globally with ObjectMapper

Find  below example.

ObjectMapper mapper = new ObjectMapper();
mapper.setSerializationInclusion(Include.NON_NULL);
mapper.setSerializationInclusion(Include.NON_EMPTY);

In the above code we have configured ObjectMapper with Include.NON_NULL and Include.NON_EMPTY using setSerializationInclusion() that ignore Null and Empty values globally for every class. Now when we write JSON using mapper instance for any given object, then the properties of that object having null or empty value will not be included in JSON.


Example of Include.NON_NULL and Include.NON_EMPTY Globally with ObjectMapper

Find the example of Include.NON_NULL and Include.NON_EMPTY with ObjectMapper
Book.java

package com.web.model;
public class Student{
	private int student_id; 
	private String student_name;
  	private String student_phone;
  	private String student_address;   
  	public student_address(){}
  	public Student(int student_id, String student_name, String student_phone, String student_address) {
  		this.student_id= student_id;
  		this.student_name= student_name;
  		this.student_phone= student_phone;
  		this.student_address= student_address;
  	}
	//setter and getter
}

IgnoreNullEmptyValueWithObjectMapper .java

package com.web;
import com.fasterxml.jackson.annotation.JsonInclude.Include;
import com.fasterxml.jackson.core.JsonProcessingException;
import com.fasterxml.jackson.databind.ObjectMapper;
public class IgnoreNullEmptyValueWithObjectMapper {
  public static void main(String[] args) throws JsonProcessingException {
    ObjectMapper mapper = new ObjectMapper();
    mapper.setSerializationInclusion(Include.NON_NULL);
    mapper.setSerializationInclusion(Include.NON_EMPTY);
    Student student= new Student (1000, "Himanshu", "", null);
    String studentJson= mapper.writerWithDefaultPrettyPrinter()
		 .writeValueAsString(student);
    System.out.println(studentJson);
  }
}

Output

{
  "student_id" : 101,
  "student_name" : "Abhishek"
}

Without Include.NON_NULL and Include.NON_EMPTY, output will be as following.

{
  "student_id" : 101,
  "student_name" : "Spring",
  "student_phone" : "",
  "student_address" : null
 }

What’s the difference between @Column(nullable = false) and @NotNull in hibernate

@Column(nullable = false)

  1. The @Column annotation is part of the JPA specification, and you already use all required dependencies.So no need to add any extra dependency in your project.
  2. Hibernate doesn’t perform any validation if you annotate an attribute with @Column(nullable = false). This annotation only adds a not null constraint to the database column, if Hibernate creates the database table definition. The database then checks the constraint, when you insert or update a record.
  3. The @Column(nullable = false) annotation only adds a not null constraint to the table definition. Hibernate or any other framework will not perform any validation on the entity attribute. Hibernate just executes the SQL INSERT/UPDATE statement, and the database will validate the constraint. If the entity attribute is null, the SQL statement will fail.


@NotNull annotation

  1. The @NotNull annotation is part of the BeanValidation specification. You need to add a dependency to the Hibernate Validator project
  2. The @NotNull annotation triggers a validation by the Bean Validation implementation when a pre-update or a pre-persist lifecycle event gets triggered. So, the validation happens within your Java application.
  3. The @NotNull annotation tells your Bean Validation implementation to check that the attribute is not null. This happens when the pre-update or pre-persist lifecycle event gets triggered. If the validation fails, Hibernate will not execute any SQL statement.

Which one is better?

You should always use the @NotNull annotation, which is defined by the Bean Validation specification. It configures a validation step that gets performed before Hibernate executes the SQL statement.


What is java.lang.UnsupportedClassVersionError in java

  • java.lang.UnsupportedClassVersionError  is a quite common error . its related to class files(unsupported class version).
  • Java.lang.UnsupportedClassVersionError is a subclass of java.lang.ClassFormatError. Most probably this error will occurs during linking phase of classloading by JVM.
  • Common root cause of this error is , you will have complied your  java code in higher version of java(JDK ) and will try to run this java class in lower version of java(JDK ) . vice-versa this error will not came.
  • Every java class file has associated with two versions  major version and minor version.

Difference between integer.parseint() and integer.valueof()

Integer.parseInt() returns primitive integer type (int).

public static Integer valueOf(String string) throws NumberFormatException {
    return valueOf(parseInt(string));
}

Integer.valueOf returns java.lang.Integer, which is the object representative of the integer.

public static int parseInt(String string) throws NumberFormatException {
    return parseInt(string, 10);
}

So if you want an Integer object, instead of primitive type then you should go for Integer.valueOf() method.

Difference between integer.tostring and string.valueof

  • string.valueof () method return “null” String if  pass value is null.
  • integer.tostring() method will be throw NullPointerException  if  pass value is null.

Example:-

public class Test {
public static void main(String args[]) {  
    String str = null;
    System.out.println(str.toString()); // This will throw a NullPointerException
    System.out.println(String.valueOf(str));  // This will print "null"        
} 
}

Date and Time Utility

import java.util.*;
import java.text.*;
public class DateTimeUtil 
{
    public final static long SECOND_MILLIS = 1000;
    public final static long MINUTE_MILLIS = SECOND_MILLIS*60;
    public final static long HOUR_MILLIS = MINUTE_MILLIS*60;
    public final static long DAY_MILLIS = HOUR_MILLIS*24;
    public final static long YEAR_MILLIS = DAY_MILLIS*365;

    public static DateFormat OUT_DATE_FORMAT = new SimpleDateFormat("dd/MM/yyyy");
    public static DateFormat OUT_TIME_FORMAT = new SimpleDateFormat("H:mm:ss");
    public static DateFormat OUT_DATETIME_FORMAT = new SimpleDateFormat("d/M/yyyy H:mm:ss");
    public static DateFormat OUT_TIMESTAMP_FORMAT = new SimpleDateFormat("d/M/yy H:mm:ss.SSS");
    
    public static DateFormat IN_DATE_FORMAT = new SimpleDateFormat("d/M/yy");
    public static DateFormat IN_TIME_FORMAT = new SimpleDateFormat("H:mm:ss");
    public static DateFormat IN_DATETIME_FORMAT = new SimpleDateFormat("d/M/yy H:mm:ss");
    public static DateFormat IN_TIMESTAMP_FORMAT = new SimpleDateFormat("d/M/yy H:mm:ss.SSS");
    
    public static DateFormat DATE_TIME_FORMAT= new SimpleDateFormat( "yyyyMMddkkmmss" );  

    public static Calendar calendar = new GregorianCalendar();

    static
    {
        IN_DATE_FORMAT.setLenient(false);
        IN_TIME_FORMAT.setLenient(false);
        IN_DATETIME_FORMAT.setLenient(false);
    }

    /**
     * Create a new DateTime. To the last second. This will not create any 
     * extra-millis-seconds, which may cause bugs when writing to stores such as
     * databases that round milli-seconds up and down. 
     */
    public static java.util.Date newDateTime()
    {
        return new java.util.Date( (System.currentTimeMillis()/SECOND_MILLIS)*SECOND_MILLIS);
    }

    /**
     * Create a new Date. To the last day.
     */
    public static java.sql.Date newDate()
    {
        return new java.sql.Date( (System.currentTimeMillis()/DAY_MILLIS)*DAY_MILLIS);
    }
    
    /**
     * Create a new Time, with no date component. 
     */
    public static java.sql.Time newTime()
    {
        return new java.sql.Time( System.currentTimeMillis()%DAY_MILLIS);
    }
    
    /**
     * Create a new Timestamp. 
     */
    public static java.sql.Timestamp newTimestamp()
    {
        return new java.sql.Timestamp( System.currentTimeMillis() );
    }
    
    /**
     * Get the seconds difference
     */
    public static int secondsDiff( Date earlierDate, Date laterDate )
    {
        if( earlierDate == null || laterDate == null ) return 0;
        
        return (int)((laterDate.getTime()/SECOND_MILLIS) - (earlierDate.getTime()/SECOND_MILLIS));
    }

    /**
     * Get the minutes difference
     */
    public static int minutesDiff( Date earlierDate, Date laterDate )
    {
        if( earlierDate == null || laterDate == null ) return 0;
        
        return (int)((laterDate.getTime()/MINUTE_MILLIS) - (earlierDate.getTime()/MINUTE_MILLIS));
    }
    
    /**
     * Get the hours difference
     */
    public static int hoursDiff( Date earlierDate, Date laterDate )
    {
        if( earlierDate == null || laterDate == null ) return 0;
        
        return (int)((laterDate.getTime()/HOUR_MILLIS) - (earlierDate.getTime()/HOUR_MILLIS));
    }
    
    /**
     * Get the days difference
     */
    public static int daysDiff( Date earlierDate, Date laterDate )
    {
        if( earlierDate == null || laterDate == null ) return 0;
        
        return (int)((laterDate.getTime()/DAY_MILLIS) - (earlierDate.getTime()/DAY_MILLIS));
    }

    
   /**
    * Roll the java.util.Time forward or backward.
    * @param startDate - The start date
    * @period Calendar.YEAR etc
    * @param amount - Negative to rollbackwards.
    */
    public static java.sql.Time rollTime( java.util.Date startDate, int period, int amount )
    {
        GregorianCalendar gc = new GregorianCalendar();
        gc.setTime(startDate);
        gc.add(period, amount);
        return new java.sql.Time(gc.getTime().getTime());
    }
    
   /**
    * Roll the java.util.Date forward or backward.
    * @param startDate - The start date
    * @period Calendar.YEAR etc
    * @param amount - Negative to rollbackwards.
    */
    public static java.util.Date rollDateTime( java.util.Date startDate, int period, int amount )
    {
        GregorianCalendar gc = new GregorianCalendar();
        gc.setTime(startDate);
        gc.add(period, amount);
        return new java.util.Date(gc.getTime().getTime());
    }
    
   /**
    * Roll the java.sql.Date forward or backward.
    * @param startDate - The start date
    * @period Calendar.YEAR etc
    * @param amount - Negative to rollbackwards.
    */
    public static java.sql.Date rollDate( java.util.Date startDate, int period, int amount )
    {
        GregorianCalendar gc = new GregorianCalendar();
        gc.setTime(startDate);
        gc.add(period, amount);
        return new java.sql.Date(gc.getTime().getTime());
    }
    
   /**
    * Roll the years forward or backward.
    * @param startDate - The start date
    * @param years - Negative to rollbackwards.
    */
    public static java.sql.Date rollYears( java.util.Date startDate, int years )
    {
        return rollDate( startDate, Calendar.YEAR, years );
    }

   /**
    * Roll the days forward or backward.
    * @param startDate - The start date
    * @param months - Negative to rollbackwards.
    */
    public static java.sql.Date rollMonths( java.util.Date startDate, int months )
    {
        return rollDate( startDate, Calendar.MONTH, months );
    }

   /**
    * Roll the days forward or backward.
    * @param startDate - The start date
    * @param days - Negative to rollbackwards.
    */
    public static java.sql.Date rollDays( java.util.Date startDate, int days )
    {
        return rollDate( startDate, Calendar.DATE, days );
    }
    
     /**
      * Checks the day, month and year are equal.
      */
     public static boolean dateEquals( java.util.Date d1, java.util.Date d2 )
     {
        if( d1 == null || d2 == null ) return false;
        
        return d1.getDate() == d2.getDate() &&
               d1.getMonth() == d2.getMonth() &&
               d1.getYear() == d2.getYear();
     }
     
     /**
      * Checks the hour, minute and second are equal.
      */
     public static boolean timeEquals( java.util.Date d1, java.util.Date d2 )
     {
        if( d1 == null || d2 == null ) return false;
        
        return d1.getHours() == d2.getHours() &&
               d1.getMinutes() == d2.getMinutes() &&
               d1.getSeconds() == d2.getSeconds();
     }


    /**
      * Checks the second, hour, month, day, month and year are equal.
      */
     public static boolean dateTimeEquals( java.util.Date d1, java.util.Date d2 )
     {
        if( d1 == null || d2 == null ) return false;               
        
        return d1.getDate() == d2.getDate() &&
               d1.getMonth() == d2.getMonth() &&
               d1.getYear() == d2.getYear() &&
               d1.getHours() == d2.getHours() &&
               d1.getMinutes() == d2.getMinutes() &&
               d1.getSeconds() == d2.getSeconds();
     }
     
     /**
     * Convert an Object of type Classs to an Object.
     */
    public static Object toObject( Class clazz, Object value ) throws ParseException
    {
        if( value == null ) return null;
        if( clazz == null ) return value;
        
        if( java.sql.Date.class.isAssignableFrom( clazz ) ) return toDate( value );
        if( java.sql.Time.class.isAssignableFrom( clazz ) ) return toTime( value );
        if( java.sql.Timestamp.class.isAssignableFrom( clazz ) ) return toTimestamp( value );
        if( java.util.Date.class.isAssignableFrom( clazz ) ) return toDateTime( value );
        
        return value;
    }
    
    /**
     * Convert an Object to a DateTime, without an Exception
     */
    public static java.util.Date getDateTime( Object value )
    {
        try
        {
            return toDateTime( value );
        }
        catch( ParseException pe )
        {
            pe.printStackTrace();
            return null;
        }
    }
    
    /**
     * Convert an Object to a DateTime.
     */
    public static java.util.Date toDateTime( Object value ) throws ParseException
    {
        if( value == null ) return null;        
        if( value instanceof java.util.Date ) return (java.util.Date)value;
        if( value instanceof String )
        {
            if( "".equals( (String)value ) ) return null;
            return IN_DATETIME_FORMAT.parse( (String)value );
        }
                
        return IN_DATETIME_FORMAT.parse( value.toString() );
    }
    
    /**
     * Convert an Object to a Date, without an Exception
     */
    public static java.sql.Date getDate( Object value )
    {
        try
        {
            return toDate( value );
        }
        catch( ParseException pe )
        {
            pe.printStackTrace();
            return null;
        }
    }

    /**
     * Convert an Object to a Date.
     */
    public static java.sql.Date toDate( Object value ) throws ParseException
    {
        if( value == null ) return null;        
        if( value instanceof java.sql.Date ) return (java.sql.Date)value;
        if( value instanceof String )
        {
            if( "".equals( (String)value ) ) return null;
            return new java.sql.Date( IN_DATE_FORMAT.parse( (String)value ).getTime() );
        }
                
        return new java.sql.Date( IN_DATE_FORMAT.parse( value.toString() ).getTime() );
    }
    
    /**
     * Convert an Object to a Time, without an Exception
     */
    public static java.sql.Time getTime( Object value )
    {
        try
        {
            return toTime( value );
        }
        catch( ParseException pe )
        {
            pe.printStackTrace();
            return null;
        }
    }
    
    /**
     * Convert an Object to a Time.
     */
    public static java.sql.Time toTime( Object value ) throws ParseException
    {
        if( value == null ) return null;        
        if( value instanceof java.sql.Time ) return (java.sql.Time)value;
        if( value instanceof String )
        {
            if( "".equals( (String)value ) ) return null;
            return new java.sql.Time( IN_TIME_FORMAT.parse( (String)value ).getTime() );
        }
                
        return new java.sql.Time( IN_TIME_FORMAT.parse( value.toString() ).getTime() );
    }
    
    /**
     * Convert an Object to a Timestamp, without an Exception
     */
    public static java.sql.Timestamp getTimestamp( Object value )
    {
        try
        {
            return toTimestamp( value );
        }
        catch( ParseException pe )
        {
            pe.printStackTrace();
            return null;
        }
    }

    /**
     * Convert an Object to a Timestamp.
     */
    public static java.sql.Timestamp toTimestamp( Object value ) throws ParseException
    {
        if( value == null ) return null;        
        if( value instanceof java.sql.Timestamp ) return (java.sql.Timestamp)value;
        if( value instanceof String )
        {
            if( "".equals( (String)value ) ) return null;
            return new java.sql.Timestamp( IN_TIMESTAMP_FORMAT.parse( (String)value ).getTime() );
        }
                
        return new java.sql.Timestamp( IN_TIMESTAMP_FORMAT.parse( value.toString() ).getTime() );
    }
    
    /**
     * Tells you if the date part of a datetime is in a certain time range.
     */
    public static boolean isTimeInRange( java.sql.Time start, java.sql.Time end, java.util.Date d )
    {
        d=new java.sql.Time(d.getHours(),d.getMinutes(),d.getSeconds());
        
        if (start==null || end==null)
        {
            return false;
        }
        
        if (start.before(end)&&(!(d.after(start)&&d.before(end))))
        {
            return false;
        }
        
        if (end.before(start)&&(!(d.after(end)||d.before(start))))
        {
            return false;
        }   
        return true;
    }

    public static  int getYear( Date date )
    {
        calendar.setTime( date );
        return calendar.get( Calendar.YEAR );
    }

    public static int getMonth( Date date )
    {
        calendar.setTime( date );
        return calendar.get( Calendar.MONTH );
    }

    public static int getDate( Date date )
    {
        calendar.setTime( date );
        return calendar.get( Calendar.DATE );
    }

    public static int getHour( Date date )
    {
        calendar.setTime( date );
        return calendar.get( Calendar.HOUR );
    }

    public static int getMinute( Date date )
    {
        calendar.setTime( date );
        return calendar.get( Calendar.MINUTE );
    }

    public static int getSeconds( Date date )
    {
        calendar.setTime( date );
        return calendar.get( Calendar.SECOND );
    }

    public static int getMillisecond( Date date )
    {
        calendar.setTime( date );
        return calendar.get( Calendar.MILLISECOND );
    }
    
    /**
     * Convert an Object to a String using Dates
     */
    public static String toString( Object date )
    {
        if( date == null ) return null;
        
        if( java.sql.Timestamp.class.isAssignableFrom( date.getClass() ) )
        {
            return OUT_TIMESTAMP_FORMAT.format( date );
        }
        if( java.sql.Time.class.isAssignableFrom( date.getClass() ) )
        {
            return OUT_TIME_FORMAT.format( date );
        }
        if( java.sql.Date.class.isAssignableFrom( date.getClass() ) )
        {
            return OUT_DATE_FORMAT.format( date );
        }
        if( java.util.Date.class.isAssignableFrom( date.getClass() ) )
        {
            return OUT_DATETIME_FORMAT.format( date );
        }
        
        throw new IllegalArgumentException( "Unsupported type " + date.getClass() );
    }

}


How to fix the “java.security.cert.CertificateException: No subject alternative names present” error?

I fixed the problem by disabling HTTPS .

import java.security.KeyManagementException;
import java.security.NoSuchAlgorithmException;
import java.security.cert.CertificateException;
import javax.net.ssl.HostnameVerifier;
import javax.net.ssl.HttpsURLConnection;
import javax.net.ssl.SSLContext;
import javax.net.ssl.SSLSession;
import javax.net.ssl.TrustManager;
import javax.net.ssl.X509TrustManager;

public static void disableSSLVerification() {
try
{
// Create a trust manager that does not validate certificate chains
TrustManager[] trustAllCerts = new TrustManager[] {new X509TrustManager() {
public java.security.cert.X509Certificate[] getAcceptedIssuers() {
return null;
}
@Override
public void checkClientTrusted(java.security.cert.X509Certificate[] arg0, String arg1)
throws CertificateException {
// TODO Auto-generated method stub

}
@Override
public void checkServerTrusted(java.security.cert.X509Certificate[] arg0, String arg1)
throws CertificateException {
// TODO Auto-generated method stub

}
}
};

// Install the all-trusting trust manager
SSLContext sc = SSLContext.getInstance(“SSL”);
sc.init(null, trustAllCerts, new java.security.SecureRandom());
HttpsURLConnection.setDefaultSSLSocketFactory(sc.getSocketFactory());

// Create all-trusting host name verifier
HostnameVerifier allHostsValid = new HostnameVerifier() {
public boolean verify(String hostname, SSLSession session) {
return true;
}
};

// Install the all-trusting host verifier
HttpsURLConnection.setDefaultHostnameVerifier(allHostsValid);
} catch (NoSuchAlgorithmException e) {
e.printStackTrace();
} catch (KeyManagementException e) {
e.printStackTrace();
}
}
}

static {
    disableSSLVerification();
}

Difference between checking count(*) and if Exists

EXISTS keyword to perform an existence check is almost always faster than using COUNT(*). EXISTS can stop as soon as the logical test proves true, but COUNT(*) must count every row, even after it knows one row has passed the test.

Normally, EXISTS is the right way and COUNT(*) the wrong way. If you want to check for existence, stop at the first match, and don’t waste time on counting them all.

Java 8 forEach loop

import java.util.HashMap;
import java.util.Map;

public class MapForEach {

public static void main(String[] args) {
Map<Integer, String> map = new HashMap<>();
map.put(1, “B”);
map.put(3, “A”);
map.put(4, “C”);
map.put(2, “D”);
map.put(6, “K”);
map.put(9, “L”);
map.put(8, “M”);
//java 8
map.forEach((k, v) -> System.out.println(“Key : ” + k + ” Value : ” + v));

//check value K exist or not
map.forEach((k, v) -> {
if (“K”.equals(v)) {
System.out.println(v+” is present!”);
}
});

//check key 8 exist or not
map.forEach((k, v) -> {
if (8==k) {
System.out.println(k+” is present!”);
}
});
}

}

Output:

Key : 1 Value : B
Key : 2 Value : D
Key : 3 Value : A
Key : 4 Value : C
Key : 6 Value : K
Key : 8 Value : M
Key : 9 Value : L
K is present!
8 is present!

Sort map by key in java

import java.util.HashMap;
import java.util.Map;
import java.util.TreeMap;

public class SortByKeyExample2 {

public static void main(String[] args) {

Map<Integer, String> map = new HashMap<Integer, String>();
map.put(1, “A”);
map.put(5, “D”);
map.put(3, “C”);
map.put(6, “B”);
map.put(9, “E”);
map.put(2, “F”);

Map<Integer, String> sortedMap = new TreeMap<Integer, String>(new Comparator<Integer>() {

@Override
public int compare(Integer o1, Integer o2) {
return o1.compareTo(o2);
}

});

// For Java 8, using lambda
//Map<Integer, String> sortedMap = new TreeMap<>((Comparator<Integer>) (o1, o2) -> o2.compareTo(o1));

sortedMap.putAll(map);

System.out.println(“Original Map :”+map);
System.out.println(“Sorted Map by key :”+sortedMap);

}

}

Output:

Original Map :{1=A, 2=F, 3=C, 5=D, 6=B, 9=E}
Sorted Map by key :{1=A, 2=F, 3=C, 5=D, 6=B, 9=E}

Sort map by value in java

import java.util.ArrayList;
import java.util.Collections;
import java.util.Comparator;
import java.util.HashMap;
import java.util.List;
import java.util.Map;

public class SortMapByValue {

public static void main(String[] args) {
Map<Integer, String> map = new HashMap<>();
map.put(1, “A”);
map.put(2, “D”);
map.put(3, “C”);
map.put(4, “B”);
map.put(5, “E”);
map.put(6, “F”);
// convert map into list
List<Map.Entry<Integer, String>> listMap = new ArrayList<>(map.entrySet());
// sort list based on comparetor java 8
Collections.sort(listMap, (o1, o2) -> o1.getValue().compareTo(o2.getValue()));

//Alternative way
Collections.sort(listMap, new Comparator<Map.Entry<Integer, String>>() {

@Override
public int compare(Map.Entry<Integer, String> o1, Map.Entry<Integer, String> o2) {
return o1.getValue().compareTo(o2.getValue()); // sorted by ASC order
// return (o2.getValue()).compareTo((o1.getValue())); // sorted// by DEC Order
}

});

// Create a new map for storing sorted data
Map<Integer, String> sortedMap = new HashMap<Integer, String>();
for (Map.Entry<Integer, String> sortedList : listMap) {
sortedMap.put(sortedList.getKey(), sortedList.getValue());
}
// Print Original Map
System.out.println(“Original Map:” + map);
// Print Sorted Map
System.out.println(“Sorted Map By Value:” + sortedMap);

}

}

Output:

Original Map:{1=A, 2=D, 3=C, 4=B, 5=E, 6=F}
Sorted Map By Value:{1=A, 2=D, 3=C, 4=B, 5=E, 6=F}

What is the difference between abstract class and interface ?


Abstract class Interface
1) Abstract class can have both abstract and non-abstract methods. 1)Interface can have only abstract methods. Since Java 8, it can have default and static methods also.
2) An abstract class can extend only one class or one abstract class at a time that means Abstract class doesn’t support multiple inheritance. 2)An interface can extend any number of interfaces at a time that means Interface supports multiple inheritance.
3) Abstract class can have final, non-final, static and non-static variables. 3)Interface has only static and final variables.
4) Abstract class can provide the implementation of interface. 4)Interface can’t provide the implementation of abstract class.
5) The abstract keyword is used to declare abstract class. 5)The interface keyword is used to declare interface.
6)An abstract class can have protected and public abstract methods 6)An interface can have only have public abstract methods.
7) An abstract class can be extended using keyword “extends”. 7)An interface class can be implemented using keyword “implements”.
8) A Java abstract class can have class members like private, protected, etc. 8)Members of a Java interface are public by default.

Note:-Disadvantage with an interface is, if you want to add a new method in interface, then you must be implement in all of the classes which implement that interface. But in the case of an abstract class, the method(non-abstract method) can be simply implemented in the abstract class and the same method can be called by its subclass.

Double brace initialization

Create the List and MAP using an anonymous subclass and initialize

import java.text.ParseException;
import java.util.ArrayList;
import java.util.HashMap;
import java.util.List;
import java.util.Map;

public class MainClass {

public static void main(String[] args) {

List numbers = new ArrayList() {{add(1);add(2);}};
System.out.println(numbers);

Map codes = new HashMap() {{put(“1”, “one”);put(“2”, “two”);}};
System.out.println(codes);

List<String> list=new ArrayList<String>(){{add(“Java”);add(“Php”);add(“C”);add(“C++”);}};
System.out.println(list);
}
}

OUTPUT

[1, 2]
{1=one, 2=two}
[Java, Php, C, C++]

It gets the name for the double {{ }} present in the expression. In the above example we are doing 2 things:
1. Create an anonymous inner class which extends ArrayList/HashMap.
2. Provide an instance initialization block which invokes the add/put method and adds the required elements

Note- The advantage we have with this approach is that we can combine creation and initialization into an expression and pass around into different methods.

OOPs Concepts in Java

List of OOPs Concepts in Java

There are four main OOPs concepts in Java. These are:

  • Abstraction. Abstraction means hiding internal details of the program and showing the only functionality of the program. for example, We all know how to turn the TV on, but we don’t need to know how it works internally in order to enjoy it.
  • Encapsulation. This is the practice of keeping fields within a class private, then providing access to them via public methods. It’s a protective barrier that keeps the data and code safe within the class itself.
  • Inheritance. This is a special feature of Object Oriented Programming in Java. It lets programmers create new classes that share some of the attributes of existing classes.
  • Polymorphism. This Java OOPs concept lets programmers use the same word to mean different things in different contexts.


How Abstraction Works

Abstraction as an OOPs concept in Java works by letting programmers create useful, reusable tools. For example, a programmer can create several different types of objects. These can be variables, functions, or data structures. Programmers can also create different classes of objects. These are ways to define the objects.

For instance, a class of variable might be an address. The class might specify that each address object shall have a name, street, city, and zip code. The objects, in this case, might be employee addresses, customer addresses, or supplier addresses.

How Encapsulation Works

It’s a powerful OOPs concept in Java because it helps us save a lot of time.  Encapsulation lets us do that while keeping our original data private. It also lets us alter our original code without breaking it for others who have adopted it in the meantime.

How Inheritance Works

Inheritance is another labor-saving Java OOPs concept. It works by letting a new class adopt the properties of another. We call the inheriting class a subclass or a child class. The original class is often called the parent. We use the keyword extends to define a new class that inherits properties from an old class.

How Polymorphism Works

Polymorphism in Java works by using a reference to a parent class to affect an object in the child class. We might create a class called “horse” by extending the “animal” class. That class might also implement the “professional racing” class. The “horse” class is “polymorphic,” since it inherits attributes of both the “animal” and “professional racing” class.

Two more examples of polymorphism in Java are method overriding and method overloading.

In method overriding, the child class can use the OOP polymorphism concept to override a method of its parent class. That allows a programmer to use one method in different ways depending on whether it’s invoked by an object of the parent class or an object of the child class.

In method overloading, a single method may perform different functions depending on the context in which it’s called. That is, a single method name might work in different ways depending on what arguments are passed to it.


Short Encapsulation Example in Java

In the encapsulation is demonstrated as an OOPs concept in Java. Here, the variable “name” is kept private or “encapsulated.”

//save as Student.java
package com.javatpoint;
public class Student {
 private String name;
 public String getName() {
  return name;
 }
 public void setName(String name) {
  this.name = name
 }
}
//save as Test.java
package com.javatpoint;
class Test {
 public static void main(String[] args) {
  Student s = new Student();
  s.setName(“vijay”);
  System.out.println(s.getName());
 }
}

Example of Inheritance in Java

It’s quite simple to achieve inheritance as an OOPs concept in Java. Inheritance can be as easy as using the extends keyword:

class Mammal {

}
class Aardvark extends Mammal {

}

Short Example of Polymorphism in Java

In the example below of polymorphism as an OOPs concept in Java, we have two classes: Person and Employee. The Employee class inherits from the Person class by using the keyword extends. Here, the child class overrides the parent class.

class Person {
 void walk() {
  System.out.println(“Can Run….”);
 }
}
class Employee extends Person {
 void walk() {
  System.out.println(“Running Fast…”);
 }
 public static void main(String arg[]) {
  Person p = new Employee(); //upcasting
  p.walk();
 }
}


GET vs. POST

Below table compares the two HTTP methods: GET and POST.

TYPE GET POST
BACK button/Reload Harmless Data will be re-submitted (the browser should alert the user that the data are about to be re-submitted)
Bookmarked Can be bookmarked Cannot be bookmarked
Cached Can be cached Not cached
History Parameters remain in browser history Parameters are not saved in browser history
Restrictions on data length Yes, (maximum URL length is 2048 characters) No restrictions
Security GET is less secure compared to POST because data sent is part of the URL


POST is a little safer than GET because the parameters are not stored in browser history or in web server logs
Visibility Data is visible to everyone in the URL Data is not displayed in the URL

REST VS SOAP Web Service

RESTful Web Service

  1. REST stands for Represntational State Transfer (REST).
  2. RESTful web service can return the response in various format e.g. XML ,JSON and HTML.
  3. Request processing  of  RESTful web service is much faster than processing request in SOAP web service.because in case of RESTful web service you need to less parsing.
  4. RESTFul messages consume less bandwidth than SOAP messages for the same type of operation.
  5. JAX-RS is the java API for RESTful web services.
  6. REST is more preferred than SOAP.


SOAP Web Service

  1. SOAP Stands for Simple Object Access Protocol (SOAP).
  2. SOAP  web service will always return the response in XML format.
  3. Request processing  of  SOAP web service is slower than processing request in RESTful web service due to parsing.
  4. SOAP messages consume more bandwidth than RESTFul messages for the same type of operation.
  5. JAX-WS is the java API for SOAP web services.
  6. SOAP is less preferred than REST.


PUT vs POST

When to use PUT or POST Lets compares them for better understanding.

PUT POST
Use PUT when you want to update a resource completely through a specific resource Id. For instance, if you know that an article resides at Id 1 then you can use PUT. Use POST when you do not know the actual resource location, for instance, when you want to add a new resource then you can POST.
PUT method is idempotent. So if you send retry a request multiple times, that should be equivalent to single request modification. POST is NOT idempotent. So if you retry the request N times, you will end up having N resources with N different URIs created on server.
Always use PUT for UPDATE operations. Always use POST for CREATE operations.

NOTE-PUT and POST are both unsafe methods. However, PUT is idempotent, while POST is not.
What is idempotent method.

HTTP request methods

GET:
The GET method requests a representation of the specified resource. Requests using GET should only retrieve data.

HEAD:
The HEAD method asks for a response identical to that of a GET request, but without the response body.

POST:
The POST method is used to submit an entity to the specified resource, often causing a change in state or side effects on the server

PUT:
The PUT method replaces all current representations of the target resource with the request payload.

DELETE:
The DELETE method deletes the specified resource.

CONNECT:
The CONNECT method establishes a tunnel to the server identified by the target resource.

OPTIONS:
The OPTIONS method is used to describe the communication options for the target resource.

TRACE:
The TRACE method performs a message loop-back test along the path to the target resource.

PATCH:
The PATCH method is used to apply partial modifications to a resource.

What is idempotent method

Idempotent methods
An idempotent HTTP method is method that can be called many times without different outcomes. It has no additional effect if it is called more than once with the same input parameters, the result would be the same.

Consider the following examples:

a = 1;//Line 1 (Idempotent)
a++; //Line 2 (Not Idempotent)

The Line 1 is idempotent because no matter how many times we execute this
statement, a will always be 1.
The Line 2 is not idempotent because executing this everytimes will result in a
different outcome.

Overview of HTTP methods

idem

Note:-

  1. An operation is called idempotent if it will produce the same results when executed once or multiple times.
  2. POST is NOT idempotent and remaining http method(GETPUTDELETEHEADOPTIONS and TRACE) are idempotent.

What are the different bean scopes in spring

There are 5 bean scopes in spring framework.

  1. singleton
  2. prototype
  3. session
  4. request
  5. globalsession

singleton

The bean instance will be only once and same instance will be returned by the IOC container. It is the default scope.

prototype

The bean instance will be created each time when requested.

session

The bean instance will be created per HTTP session.

request

The bean instance will be created per HTTP request.

globalsession

The bean instance will be created per HTTP global session. It can be used in portlet context only.


No. Scope Description
1) singleton The bean instance will be only once and same instance will be returned by the IOC container. It is the default scope.
2) prototype The bean instance will be created each time when requested.
3) request The bean instance will be created per HTTP request.
4) session The bean instance will be created per HTTP session.
5) globalsession The bean instance will be created per HTTP global session. It can be used in portlet context only.

Hibernate Objects States And Lifecycle

Hibernate has provided three different states for an object of a pojo class. pojo class is nothing but a class that represents a table in database .These three states are also called as life cycle states of an object in hibernate.

There are three types of Hibernate object states.

  • Transient state
  • Persistent state
  • Detached state

Transient state

An object which is not associated with hibernate session and does not represent a row in the database or there is no reference of it in the database is considered as transient, that means its just an normal object.

Persistent state

An object is in the persistent state if it has some reference in the database i.e it represent one row of the database and it is associated with the unique Session. If any changes are made to the object then hibernate will detect those changes and effects will be there in the database .

Detached state

Object which is just removed from hibernate session is called as detached object and state of that object is detached  state.

Mysql server gone away error 2006 in mysql

The MySQL server has gone away (error 2006) has two main causes and solutions:

  • Server timed out and closed the connection. To fix, check that wait_timeout mysql variable in your my.cnf configuration file is large enough.
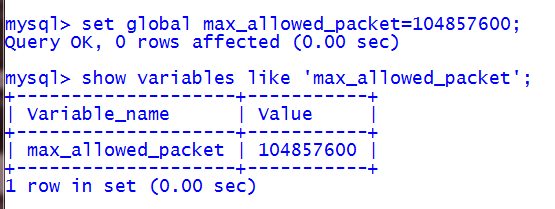
  • Server dropped an incorrect or too large packet. If mysqld gets a packet that is too large or incorrect, it assumes that something has gone wrong with the client and closes the connection. To fix, you can increase the packet size limit .

Mysql command:

Use this command for ncrease the packet size limit .

set global max_allowed_packet=104857600

104857600=100MB

To display max_allowed_packet size limit use this command

show variables like 'max_allowed_packet';

Example:

mysqlerror.PNG

What is the serialVersionUID ?

SerialVersionUID is a constant that uniquely identifies for a serializable class. The JVM checks this constant during the deserialization process when an object is being constructed from an input stream. If the object being read has a serialVersionUID different than the one specified in the class, the JVM throws an InvalidClassException.

Note:-

SerialVersionUID is optional. That means the Java compiler will generate one if you don’t explicitly declare it.

Why should you declare a serialVersionUID explicitly?

The auto-generated serialVersionUID is calculated based on elements of the class: member variables, methods, constructors, etc. If one of these elements get change, the serialVersionUID will be changed as well.

For Example:-

  • You wrote a program that stores some objects of the Student class to a file and the Student class doesn’t have a serialVersionUID explicitly declared.
  • Later you update the Student class (e.g. added some methods/variables), and now the auto-generated serialVersionUID gets changed as well.
  • Your program fails to deserialize because there serialVersionUID are different. The JVM throws an InvalidClassException.

That’s why it’s recommended to add a serialVersionUID explicitly for a serializable class.

Differences between String.valueOf(Object) and Object.toString()

Java String valueOf  method
String class valueOf(Object) method converts different types of values into string.

valueOf() method of String class is static

Using String .valueOf(Object) method, you can convert

  • int to string(public static String valueOf(int i) )
  • long to string(public static String valueOf(lang i) )
  • character to string(public static String valueOf(char c))
  • float to string(public static String valueOf(float f) )
  • double to string(public static String valueOf(double d) )
  • boolean to string(public static String valueOf(boolean b))
  • object to string(public static String valueOf(Object o))
  • char array to string.(public static String valueOf(char[] c)

NOTE :-

  • If string is null then String.valueOf() method will prints null
  • but if string is null then Object.toString() method will throw nullPointerException.

Example:

class Demo {
public static void main(String args[]){  
    String str = null;
    System.out.println(String.valueOf(str));//print null        
    System.out.println(str.toString());//NullPointerException        
} 
}

How to check is excel file is blank?

Below is the code to check the worksheet is empty (blank worksheet)

class ExcelEmptyCheck{

Public static void main(String[] args) throws FileNotFoundException, IOException {
Workbook wBook = new XSSFWorkbook(new FileInputStream(“D:\\devicexls\\test_xls.xlsx”));
for (int i = 0; i < wBook.getNumberOfSheets(); i++) {
System.out.println("Sheet :: " + wBook.getSheetName(i) + " has data:: " + isSheetEmpty(wBook.getSheetAt(i)));
}
}

static boolean isSheetEmpty(Sheet sheet) {
Iterator rows = sheet.rowIterator();
Row row = null;
Cell cell = null;
while (rows.hasNext()) {
row = rows.next();
Iterator cells = row.cellIterator();
while (cells.hasNext()) {
cell = cells.next();
if (!cell.getStringCellValue().isEmpty()) {
return true;
}
}
}
return false;
}
}

How to check empty rows in excel using java

We have to iterate through all cells in the row and check if they are all empty. Below is the Solution.

Private static boolean isRowEmpty(Row row) {
if (row == null) {
return true;
}
if (row.getLastCellNum() <= 0) {
return true;
}
for (int c = row.getFirstCellNum(); c < row.getLastCellNum(); c++) {
Cell cell = row.getCell(c);
if (cell != null && cell.getCellType() != Cell.CELL_TYPE_BLANK)
return false;
}
return true;
}

StringUtils.isNotEmpty() VS StringUtils.isNotBlank()

StringUtils.isNotEmpty()

StringUtils.isNotEmpty() is used to find if the String is not empty/String is length 0 and not null.

Example:

StringUtils.isNotEmpty(null)      = false
StringUtils.isNotEmpty(“”)        = false
StringUtils.isNotEmpty(” “)       = true
StringUtils.isNotEmpty(”  lol  “) = true
StringUtils.isNotEmpty(“lol”)     = true

StringUtils.isNotBlank()

StringUtils.isNotBlank() takes it a step forward. It not only checks if the String is not empty and not null, but also checks if it is not only a whitespace string.

Example:

StringUtils.isNotBlank(null)      = false
StringUtils.isNotBlank(“”)        = false
StringUtils.isNotBlank(” “)       = false
StringUtils.isNotBlank(“str”)     = true
StringUtils.isNotBlank(”  str  “) = true

Jsp Include Directive

Jsp Include Directive

The JSP include directive <%@ include %> is used to merging external files (jsp file, html file or text file) into the current JSP page at translation time. The jsp page is translated only once so it will be better to include static resource or files.

Advantage of Include directive

Code Reusability

Syntax of include directive

<%@ include file="URL of the resource" %>

Example of include directive

In this example, we are including the content of the file1.jsp file into index.jsp file.

  1. index.jsp
    <html>
    <head>
    <title>Main JSP Page</title>
    </head>
    <body>
    <%@ include file="file1.jsp" %>
    Main JSP Page: The jsp page is translated only once so it will be better to include static resource or files.
    </body>
    </html>
  2. file1.jsp
    <p>
    This is my File1.jsp and I will include it in index.jsp using include directive
    </p>


Sharing data between servlets

suppose i want to share emailid  and username between two servlet .

index.html

<html>
<body>
<form action=“FirstServlet”>
Name:<input type=“text” name=“name”/><br>
Email-ID:<input type=“text” name=“email”/><br>
<input type=“submit” value=“go”/>
</form>
</body>
</html>


FirstServlet.java

import java.io.*;
import javax.servlet.*;
import javax.servlet.http.*;
public class FirstServlet extends HttpServlet {
public void doGet(HttpServletRequest request, HttpServletResponse response){
try{
response.setContentType(“text/html”);
PrintWriter out = response.getWriter();
String name=request.getParameter(“name”);
String email=request.getParameter(“email”);
out.print(“Name= “+name);
out.print(“Email= “+email);
HttpSession session=request.getSession();
session.setAttribute(“username”,name);
session.setAttribute(“emilid”,email);
out.print(“<a href=’SecondServlet’>Go to Second servlet</a>”);
out.close();
}catch(Exception e){System.out.println(e);}
}
}

SecondServlet.java

import java.io.*;
import javax.servlet.*;
import javax.servlet.http.*;

public class SecondServlet extends HttpServlet {

public void doGet(HttpServletRequest request, HttpServletResponse response)
try{

response.setContentType(“text/html”);
PrintWriter out = response.getWriter();

HttpSession session=request.getSession();
String name=(String)session.getAttribute(“username”);
String email=(String)session.getAttribute(“emailid”);
out.print(“Name= “+name);
out.print(“Email= “+email);
out.close();
}catch(Exception e){System.out.println(e);}
}
}

web.xml


<web-app>
<servlet>
<servlet-name>FirstServlet</servlet-name>
<servlet-class>FirstServlet</servlet-class>
</servlet>

<servlet-mapping>
<servlet-name>FirstServlet</servlet-name>
<url-pattern>/FirstServlet</url-pattern>
</servlet-mapping>

<servlet>
<servlet-name>SecondServlet</servlet-name>
<servlet-class>SecondServlet</servlet-class>
</servlet>

<servlet-mapping>
<servlet-name>SecondServlet</servlet-name>
<url-pattern>/SecondServlet</url-pattern>
</servlet-mapping>
</web-app>


Content Type

Content Type

Content Type is also known as MIME (Multipurpose internet Mail Extension) Type. It is a HTTP header that provides the description about what are you sending to the browser.

There are many content types:

  • text/html
  • text/plain
  • application/msword
  • application/vnd.ms-excel
  • application/jar
  • application/pdf
  • application/octet-stream
  • application/x-zip
  • images/jpeg
  • video/quicktime etc.

JSP directives

JSP directives

Directive Tag gives special instruction to Web Container at the time of page translation. how to translate a JSP page into the corresponding servlet.

Directive tags are of three types:

  • page directive
  • include directive
  • taglib directive


Directive Description
<%@ page ... %> defines page dependent properties such as language, session, errorPage etc.
<%@ include ... %> defines file to be included.
<%@ taglib ... %> declares tag library used in the page


The Page directive defines a number of page dependent properties which communicates with the Web Container at the time of translation.

Syntax of JSP page directive

 <%@ page attribute=“value” %>  

Attributes of JSP page directive

  1. extends attribute.
  2. import attribute.
  3. language attribute
  4. isThreadSafe attribute
  5. isErrorPage attribute
  6. errorPage attribute
  7. contentType attribute
  8. buffer attribute
  9. session attribute
  10. autoFlush attribute
  11. isELIgnored

import attribute

The import attribute is used to import class,interface or all the members of a package.It is similar to import keyword in java class or interface. For example

<html>  
<body>  
<%@ page import="java.util.Date" %>  
Today is: <%= new Date() %>    
</body>  
</html>  

language attribute

The language attribute specifies the scripting language used in the JSP page. The default value is “java”.


extends attribute

extends attribute defines the class name of the superclass of the servlet class that is generated from the JSP page.


session attribute

session attribute defines whether the JSP page is participating in an HTTP session. The value is either true or false.

Default value for this attribute: true

Syntax of session attribute:

<%@ page session="value"%>

Examples of session:

<%@ page session="true"%>

The above code would allow a page to have session implicit objects.

<%@ page session="false"%>

If this code is specified in a JSP page, it means session objects will not be available for that page. Hence session cannot be maintained for that page.


isThreadSafe attribute

isThreadSafe attribute declares whether the JSP is thread-safe.The value is either true or false


isErrorPage attribute

This attribute is used to specify whether the current JSP page can be used as an error page for another JSP page. If value of isErrorPage is true it means that the page can be used for exception handling for another page.

Syntax of isErrorPage attribute:

<%@ page isErrorPage="value"%>

Here value is either true OR false.

Example of isErrorPage:

<%@ page isErrorPage="true"%>

Note: The exception object can only be used in the error page.


errorPage attribute

The errorPage attribute is used to define the error page, if exception occurs in the current page, it will be redirected to the error page.

Syntax of errorPage attribute:

<%@ page errorPage="value"%>

Example of errorPage:

<%@ page errorPage="error.jsp"%>

contentType attribute

contentType attribute defines the MIME type for the JSP response.This attribute is used to set the content type of a JSP page.

Default value: text/html

Syntax of contentType attribute:

<%@ page contentType="value"%>

Example of contentType:

<%@ page contentType="text/html"%>

for text/xml based pages:

<%@ page contentType="text/xml"%>

autoFlush attribute

autoFlush attribute defines whether the buffered output is flushed automatically. The default value is “true”.


buffer attribute

buffer attribute defines how buffering is handled by the implicit out object.

JSP exception object

JSP exception object

JSP exception implicit object is instance of java.lang.Throwable class .

It is used for exception handling in JSP. But it can only be used in error pages, which means a JSP page should have isErrorPage to true in order to use exception implicit object.

Example of exception implicit object:

index.html


<html>

<body>

<form action="first.jsp"> 
Enter First No:<input type="text" name="firstnum" />

Enter Second No:<input type="text" name="secondnum" /> 

<input type="submit" value="Get Results"/> 

</form>

</body>

</html>


first.jsp


<%@ page errorPage="error.jsp" %> 
<% 

String n1=request.getParameter("firstnum"); 

String n2=request.getParameter("secondnum"); 

int n1= Integer.parseInt(n1);

int n2= Integer.parseInt(n2);

int r= v1/v2;

out.print("Output is: "+ r);

%>


error.jsp


<%@ page isErrorPage="true" %> 

<%= exception %> 


JSP page Object

JSP page Object

JSP page implicit object is instance of java.lang.Object class and represents the current JSP page.

JSP page implicit  object provide reference to the generated servlet class(Converted Servlet, generated during translation phase from a JSP page). This object is very rarely used.

The page object is really a direct synonym for the this object.

Object page=this;

For using this object it must be cast to Servlet type

JSP pageContext object

JSP pageContext object

JSP pageContext implicit object is instance of javax.servlet.jsp.PageContext.

It is used to  get attribute, set attribute and remove attribute at any of the below scope–

  1. JSP Page – Scope: PAGE_CONTEXT
  2. HTTP Request – Scope: REQUEST_CONTEXT
  3. HTTP Session – Scope: SESSION_CONTEXT
  4. Application Level – Scope: APPLICATION_CONTEXT


Example of pageContext implicit object

index.html


<html>

<head>

<body>

<form action="first.jsp">

<input type="text" name="uname"><br>

<input type="text" name="password"><br>

<input type="submit" value="Login">

</form>

</body>

</html>

first.jsp


<html>

<body>

<% 
String name=request.getParameter("uname");

String pass=request.getParameter("password");

out.println("hello "+name);

pageContext.setAttribute("UName", name, PageContext.SESSION_SCOPE);

pageContext.setAttribute("UPassword", pass, PageContext.SESSION_SCOPE);

%>
<a href="second.jsp">Go to second jsp</a>

</body>

</html>

second.jsp


<html>

<body>

<%

String name= (String) pageContext.getAttribute("UName", PageContext.SESSION_SCOPE);

String password= (String) pageContext.getAttribute("UPassword", PageContext.SESSION_SCOPE);

out.println("Name="+name);

out.println("Password= "+password);
%>
</body>

</html>


JSP session object

 JSP session object

JSP session implicit object is instance of javax.servlet.http.HttpSession.

The instance of HttpSession is created by the web container.

It  is used for storing the user’s data to make it available on other JSP pages till the user session is active.if session is inactive then user data is loss.

it is also used to set,get or remove attribute from sessionscope.

Example of session implicit object

index.html


<html>  
<body>  
<form action="first.jsp">  
<input type="text" name="uname">  
<input type="text" name="email">  
<input type="submit" value="Click"><br>  
</form>  
</body>  
</html>  

first.jsp


<html>  
<body>  
<%     
String name=request.getParameter("uname");  
String emailid=request.getParameter("email");  
out.print("Name="+name);    
out.print("Email-Id="+emailid);    
session.setAttribute("user",name);    
session.setAttribute("email",emailid);   
<a href="second.jsp">Click to go second jsp </a>    
%>  
</body>  
</html>  

second.jsp


<html>  
<body>  
<%     
String name=(String)session.getAttribute("user");  
String emailid=(String)session.getAttribute("email"); 
out.print("Name="+name);    
out.print("Email-Id="+emailid);   
%>  
</body>  
</html>  


JSP application object

JSP application object

JSP application implicit object is instance of javax.servlet.ServletContext.

The instance of ServletContext is created only once by the web container.it is use to get configuration information from web.xml file .

JSP config implicit object get information from <init-param> tag of web.xml file but JSP application implicit  object get information from <context-param> tag of web.xml.


Example of application implicit object:

index.html


<html>
<body>
<form action="first">
<input type="text" name="uname">
<input type="submit" value="Click"><br>
</form>
</body>
</html>

web.xml file


<web-app>
<servlet>
<servlet-name>demo</servlet-name>
<jsp-file>/first.jsp</jsp-file>
</servlet>
<servlet-mapping>
<servlet-name>demo</servlet-name>
<url-pattern>/first</url-pattern>
</servlet-mapping>
<context-param>
<param-name>name</param-name>
<param-value>Abhishek kumar</param-value>
</context-param>
</web-app>

first.jsp


 <%
 out.print("Hello "+request.getParameter("uname"));
 String name=application.getInitParameter("name");
 out.print("Name="+name);
 %>


JSP config object

JSP config implicit object

JSP config implicit object is instance of javax.servlet.ServletConfig.

The JSP config object is created by the web container for each jsp page.

The JSP config objectis  mainly used for accessing initialization parameter  from the web.xml file.

Example of config implicit object:

index.html


<html>
<body>
<form action="first">  
<input type="text" name="uname">  
<input type="submit" value="Click"><br/>  
</form>  
</body>
</html>

web.xml file


<web-app>    
<servlet>  
<servlet-name>demo</servlet-name>  
<jsp-file>/first.jsp</jsp-file> 
<init-param>  
<param-name>name</param-name>  
<param-value>Abhishek kumar</param-value>  
</init-param>  
<init-param>  
<param-name>email</param-name>  
<param-value>gkvstudent@gmail.com</param-value>  
</init-param> 
</servlet>  
<servlet-mapping>  
<servlet-name>demo</servlet-name>  
<url-pattern>/first</url-pattern>  
</servlet-mapping>  
</web-app>  

first.jsp


<%   
out.print("Welcome "+request.getParameter("uname"));    
String name=config.getInitParameter("name");  
String emailid=config.getInitParameter("email");  
out.print("Name="+name);  
out.print("Email-Id="+emailid);  
%>  

JSP response object

JSP response object

JSP response implicit object is instance of javax.servlet.http.HttpServletResponse.

The instance of HttpServletResponse is created by the web container for each jsp request.It is basically used to sent response to the client(browser) after processing the request.

It is also used to set content type, header information in response, adding cookies to response and redirecting the request to other resource.


Example of response implicit object

index.html


<html>

<body>
<form action="first.jsp">   
<input type="submit" value="Open Facebook"><br/>  
</form>  
</body>
</html>

first.jsp


<%

response.sendRedirect("https://www.facebook.com");  
%> 

JSP request Object

JSP request Object

JSP request implicit object is instance of javax.servlet.http.HttpServletRequest . it’s one of the argument of JSP service method. jsp request  object is created by the web container We can use request object to get the request parameters, cookies, request attributes, session, header information e.t.c.

Example of JSP request implicit object

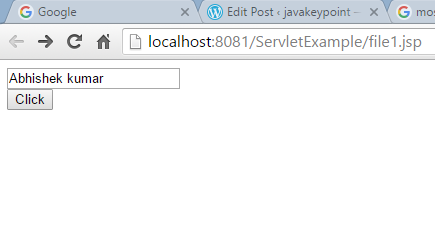
index.html


<html>
<body>
<form action="first.jsp">
<input type="text" name="name">
<input type="submit" value="Click"><br/>
</form>
</body>
</html>
 Screenshot (25)

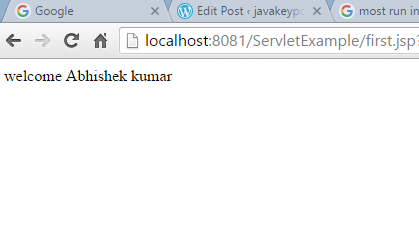
first.jsp


 <%
String name=request.getParameter("name");
out.print("welcome "+name);
%>
Screenshot (26)

JSP out Object

JSP out Object

JSP out  object is instance of javax.servlet.jsp.JspWriter. it is used for writing content to the client (browser) response. This is one of the most used JSP implicit object and thats why we have JSP Expression to easily invoke out.print() method.

In simple words out implicit object is used to write content to the client response.

Example of out implicit object

In this example we are simply displaying message on browser

index.jsp


<html>  
<body>  
<% out.print("Hello Jsp"); %>
</body>  
</html>  

Output

Screenshot (14)


Another example of out implicit object

index.jsp


<html>  
<body>  
<form action="first.jsp">
<input type="text" name="name" /><br>
<input type="submit" value="Click"/>
</form>
</body>  
</html>  
Screenshot (25)

first.jsp


<html>  
<body>  
<% out.print(request.getParameter("name")); %>  
</body>  
</html>  

Screenshot (24)

JSP – Implicit Objects

JSP Implicit Objects

JSP Implicit Objects are the Java objects .These objects are created by the web container that are available to all the jsp pages JSP Implicit Objects are also know as pre-defined variables.

JSP Implicit Objects  are only  direclty use  in JSP scriptlets tag.it can’t use in JSP Declaration tag.because JSP Declaration tag  code will go outside of  _jspService() method .

There  are 9 implicit objects in jsp . of them are declared as local variable  inside  _jspService() method whereas 2 of them are part of _jspService() method argument

A list of the 9 implicit objects is given below:

  1. out Object
  2. request Object
  3. response Object
  4. config Object
  5. application Object
  6. session Object
  7. pageContext Object
  8. page Object
  9. exception Object

JSP object and their types

Object Type
request javax.servlet.http.HttpServletRequest
response javax.servlet.http.HttpServletResponse
out javax.servlet.jsp.JspWriter
session javax.servlet.http.HttpSession
application javax.servlet.ServletContext
config javax.servlet.ServletConfig
pageContext javax.servlet.jsp.PageContext
page java.lang.Object
Exception javax.servlet.jsp.JspException.

JSP Declaration Tag

JSP Declaration Tag

he JSP declaration tag is used to declare fields and methods.The code written inside the jsp declaration tag is placed outside the service() method of auto generated servlet.So it doesn’t get memory at each request.

Syntax of Declaration Tag


<%! declaration %>


Example of Declaration Tag

<html>
    <head>
        <title>My First JSP Page</title>
    </head>
   <%!
       int count = 0;
   %>
  <body>
        Page Count is:  
        <% out.println(++count); %>   
  </body>
</html>

The above JSP page becomes this Servlet


public class hello_jsp extends HttpServlet
{
  int count=0;
  public void _jspService(HttpServletRequest request, HttpServletResponse response) 
                               throws IOException,ServletException
    {
      PrintWriter out = response.getWriter();
      response.setContenType("text/html");
      out.write("<html><body>");
      
      out.write("Page count is:");
      out.print(++count);
      out.write("</body></html>");
   }
}

JSP expression tag

JSP expression tag

The code written inside JSP expression tag is put into the bracket of  print() method . So you need not write out.print() to write data. The code written inside JSP expression tag are place into Service method of generated Servlet . It is mainly used to print the values of variable and  method.

Syntax of Expression Tag

<%= JavaExpression %>

When the Container sees this

<%= "Hello" %>

It puts into print() method 

out.print("Hello");

Note: Never end an expression with semicolon inside Expression Tag.

<%= "Hello"; %> Never end an expression with semicolon

Example of Expression Tag

<html>
    <head>
        <title>My First JSP Page</title>
    </head>
   <%
       int count = 0;
   %>
  <body>
        Page Count is  <%= ++count %>   
  </body

JSP Scriptlet tag

Jsp Scriptlet tag

Jsp scriptlet tag is used to insert java code into servlet that will be generated from jsp page.java code written inside scriptlet tag are placed into  service method of JSP.we can’t declare method inside jsp scriptlet tag.

In simple word  JSP Scriptlet Tag allows you to write java code inside JSP page.

Syntax of Jsp Scriptlet tag

<%  java source code %>  

Example of Jsp Scriptlet tag


<html>
<head>
<title>My First JSP Page</title>
</head>
<body>
<% 
  out.println("Hello JSP");
             %> 
</body>
</html>


Output:
Hello JSP


JSP Scripting elements

JSP Scripting elements

JSP scripting elements allow you to insert Java programming language statements in your JSP pages. Scripting elements are typically used to create and access objects, define methods, and manage the flow of control.

There are three types of scripting elements.

  • scriptlet tag
  • expression tag
  • declaration tag


Jsp Scriptlet tag

Jsp scriptlet tag is used to insert java code into servlet that will be generated from jsp page.java code written inside scriptlet tag are placed into  service method of JSP.we can’t declare method inside jsp scriptlet tag.

In simple word  JSP Scriptlet Tag allows you to write java code inside JSP page.

Syntax of Jsp Scriptlet tag

<%  java  code %>  

Example of Jsp Scriptlet tag


html>
    <head>
        <title>My First JSP Page</title>
    </head>
   
  <body>
          <% 
           out.println("Hello JSP");
             %> 
  </body>
</html>


Output:
Hello JSP


Creating JSP Page in Eclipse

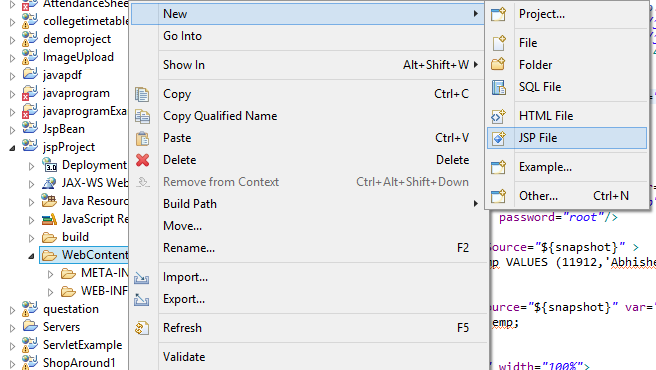
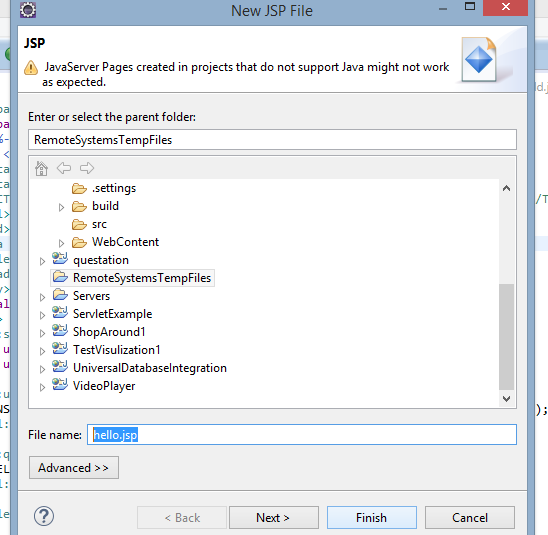
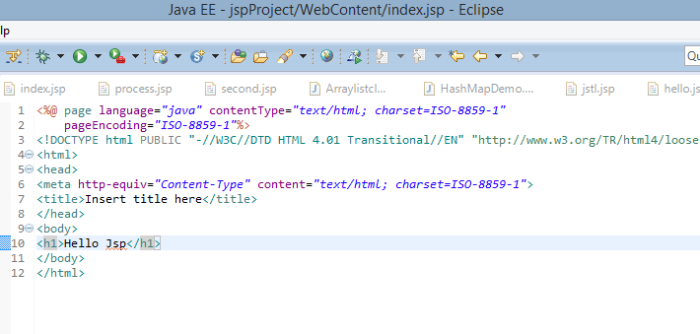
How to create a JSP Page in Eclipse

Following steps required to create a JSP Page in Eclipse.

Step 1:– Open Eclipse and click on File –>New –>Dynamic Web Project.


Screenshot (15)


Step 2:– Give a name to your project and click on finish.


Screenshot (16)


Step 3:– You will see a name of project created on Project Explorer on Eclipse window.


Screenshot (22)


Step 4:-To create a new JSP file right click on Web Content directory, New -> JSP file.


Screenshot (18)


Step 5:- Give a name to your JSP file and click  on finish.


Screenshot (19)


Step 6:– Write something in your JSP file inside body tag.


Screenshot (20)


Step 7:- To run your project, right click on Project, select Run –> Run on Server.


Screenshot (21)


Step 8:- See the Output.


Screenshot (14)

How Jsp Work

JSP API

The JSP API consists of two packages:

  1. javax.servlet.jsp
  2. javax.servlet.jsp.tagext

javax.servlet.jsp package

The javax.servlet.jsp package has two interfaces

  1. JspPage
  2. HttpJspPage

The classes are as follows:

  • JspWriter
  • JspFactory
  • JspEngineInfo
  • PageContext
  • JspError
  • JspException


Note:– Acconding to jsp specification the servlet class which is generated from jsp page must be implements JspPage interface and HttpJspPage interface.

Methods of JspPage interface(javax.servlet.JspPage)

The JspPage interface provides the two life cycle method of JSP.

  1. public void jspInit(): It is invoked only once in life cycle of the JSP when client firstly request of any  JSP page . It is used to perform initialization. This method is call from servlet Init() method.
  2. public void jspDestroy(): It is invoked only once in the life cycle of the JSP .This method is call from servlet Destroy() method .It is used to perform  clean up operation.

The HttpJspPage interface(javax.servlet.HttpJspPage)

The HttpJspPage interface provides the one life cycle method of JSP. It extends the JspPage interface.

Method of HttpJspPage interface:

  1. public void _jspService(): It is invoked each time when request for the JSP page comes to the container. It is used to process the request. This method is call from servlet Service()method.

How jsp work

Step 1 :- Web Container translates JSP code into a servlet class source(.java) file.

Step 2:- Compiler  compile .java file and generate .class file.

Step 3:– The classloader load .class file and Web Container  creates an instance of that servlet class.

Step 4:- Web Container call the jspInit()method to initialized servlet.

Step 5:- Web Container creates thread and  call the _jspService()method For each request.

Step 6:- When the Web Container removes the servlet instance from service, it calls the jspDestroy() method to perform any required clean up process.


jsp

Jsp Tutorial

Jsp Tutorial

Jsp is an acronym of java server page . it is a server-side technology.it is used to create Web-based applications just like Servlet technology, Jsp is an extension to the Java servlet technology that was developed by Sun Microsystems.Jsp technology  provides more functionality than servlet technology such as JSP Standard Tag Library(jstl),Expression Language(EL), Custom Tag  etc.JSP is similar to PHP and ASP, but it uses the Java programming language.

Jsp technology and servlet technology are opposite to each other in the sence , jsp contains java code inside Html code but servlet contains Html code inside java code. The jsp pages are easier to maintain as compare to servlet because we can separate presentation logic and business logic.

In simple word JavaServer Pages (JSP) technology provides a simplified, fast way to create web pages that display dynamically-generated content.

Note:-JSP pages are saved having extension .jsp .

Jsp Life Cycle

When client such like as browser makes a request to Server,then  first request goes to container. Then container checks whether the corresponding servlet class is load or not.if servlet class is not load then container does the translation again (converts JSP to Servlet) otherwise it skips the translation phase.

Following steps are invoked  in  jsp  life cycle:

  1. Translation
  2. Compilation
  3. Loading
  4. Instantiation
  5. Initialization
  6. RequestProcessing
  7. Destroy


 Simple JSP  Example

To create the first jsp example in apache tomcat server.

1.open notepad  and write html code as given below.

Screenshot (13)

2.Save file with name index.jsp .

3. Now go in the webapps directory in apache tomcat.

Screenshot (11)

4.Create folder inside webapps directory of Apache tomcat amd put index.jsp file inside the folder. suppose you create folder having name jsp .

Screenshot (12)


How to run a simple JSP Example .

Following steps to execute  JSP Example:

1.Start Apache tomcat server.

2.Open browser like chrome and write in  url bar of browser  http://localhost:portno of server /contextRoot/jspfile. e.g   http://localhost:8080 /jsp/index.jsp.

Screenshot (14)

ListIterator vs Iterator interface

Both Iterator and ListIterator are used to iterate elements of a collection class. Using Iterator we can traverse elements of a collection class  forward direction only  while using ListIterator we can traverse elements of a collection class either forward   and backward directions.

Iterator interface

  • Iterator Interface is used to traverse the element of collection class in forward direction.
  • Iterator is used for traversing List and Set both.
  • We cannot replace the existing element value when using Iterator


Commonly used methods of Iterator Interface:

  1. public boolean hasNext() : this method returns true if this Iterator has more element to iterate Otherwise, returns false.
  2. public Object next() :Returns the next element. Throws NoSuchElementException if there is not a next element.
  3. public void remove() :  method remove the last element return by the iterator (optional operation).this method only calls once per call to next().


Example of How to use Iterator in Java

import java.util.ArrayList;
import java.util.Iterator;
 
public class MyIteratorDemo {
  public static void main(String args[]){
    ArrayList<String> names = new ArrayList<String>();
    names.add("A");
    names.add("B");
    names.add("C");
 
    Iterator<String> it = names.iterator();
 
    while(it.hasNext()) {
      String obj = it.next();
      System.out.println(obj);
    }
 }
}

Output:

A
B
C

ListIterator Interface

  • ListIterator Interface is used to traverse the element in backward and forward direction.
  •  ListIterator is use  to traverse element of  List only, we cannot traverse element of  Set using ListIterator.
  • we can replace the last element returned by next() or previous() methods of ListIterator interface by using set(E e) method of ListIterator interface

 Methods of ListIterator Interface:

  1. public boolean hasNext() :Returns true if there is a next element. Otherwise, returns false.
  2. public Object next(): Returns the next element. Throws NoSuchElementException if there is not a next element.
  3. public boolean hasPrevious(): Returns true if there is a previous element. Otherwise, returns false.
  4. public Object previous():Returns the previous element. A NoSuchElementException is thrown if there is not a previous element.
  5. public void add(Object obj) : Inserts obj into the list in front of the element that will be returned by the next call to next( ).
  6. public int nextIndex( ) :Returns the index of the next element. If there is not a next element, returns the size of the list.
  7. public int previousIndex( ) :Returns the index of the previous element. If there is not a previous element, returns -1.
  8. public void set(Object obj) : Replaces the last element returned by next() or previous() with the specified element (optional operation).
  9. public void remove() :  method remove the last element return by the iterator (optional operation).this method only calls once per call to next().


Example of how to use Iterator in Java

import java.util.ArrayList;
import java.util.List;
import java.util.ListIterator;
 
public class MyListIteratorDemo {
  public static void main(String a[]){
    List<String> list= new ArrayList<String>();
    list.add("A");
    list.add("B");
    list.add("C");
    list.add("D");
    list.add("E");
    //Obtaining listiterator
    ListIterator<String> litr =list.listIterator();
 
    System.out.println("Traversing the list element in forward direction:");
    while(litr.hasNext()){
       System.out.println(litr.next());
    }
    System.out.println("\nTraversing the list element in backward direction:");
    while(litr.hasPrevious()){
       System.out.println(litr.previous());
    }
  }
}

Output:

Traversing the list element in forward direction:
A
B
C
D
E

Traversing the list element in backward direction:
E
D
C
B
A


Java interview question

Basic java interview question

What is the most important feature of Java?.
Ans: Java is a platform independent language.

What is a JVM?
Ans: JVM is Java Virtual Machine which is a run time environment for the compiled java class files.

What is the difference between a JDK and a JVM?
Ans: JDK is Java Development Kit which is for development purpose and it includes execution environment also. But JVM is purely a run time environment and hence you will not be able to compile your source files using a JVM.

Is Java platform independent?.

Ans:  Yes. Java is a platform independent language. We can write java code on one platform and run it on another platform. For e.g. we can write and compile the code on windows and can run it on Linux or any other supported platform.

What do you mean by platform independence? 
Ans : Platform independence means that we can write and compile the java code in one platform (eg: Windows) and can execute the class in any other supported platform eg: (Linux,     Solaris, etc).

How many types of memory areas are allocated by JVM?

Ans: There are five types of memory areas inside JVM
1.Class(Method)Area
2.Heap,
3.Stack,
4.Program Counter Register and
5.Native Method Stack

What is classloader?

Ans: The classloader is a subsystem of JVM that is used to load classes and interfaces.There are many types of classloaders e.g. Bootstrap classloader, Extension classloader, System classloader, Plugin classloader etc.

What is class?

Ans : Class is nothing but a template that describes the data and behavior associated with instances of that class

Can a .java file contain more than one java classes?
Ans : Yes.A.java file contain more than one java classes, provided at the most one of them is a public class.

What is the parent class of all classes in java?
Ans: Object class.this is present inside java.lang package.

Does Java support multiple inheritance?
Ans: Java doesn’t support multiple inheritancein case of class but it support in case of interface.

What is constructor?

Ans: Constructor is a special types of  method that is used to initialize the state of an object. It is invoked at the time of object creation.

Is Java a pure object oriented language? 
Ans: Not because Java uses primitive data types and hence is not a pure object oriented language.

What is Casting?

Ans : Casting is used to convert the value of one type to another.

What is difference between Path and Classpath? 
Ans:  Path is used to specify the location of the executables(.exe) files and classpath is used to specify the location of .class files.

What is local variables in java? 
Ans: Local varaiables are those which are declared within a methods. Local variables should be initialised before accessing them. local variables are not automatically initialized to their default values.

What is the purpose of default constructor?

Ans: The default constructor provides the default values to the objects. The java compiler creates a default constructor only if there is no constructor in the class.

What is instance variables in java? 
Ans: Instance variables are those which are defined at the class level. Instance variables need not be initialized before using them as they are automatically initialized to their default values.

What is default and parameterized constructors?

Ans: Default: Constructors with no arguments are known as default constructors
Parameterized: Constructor with arguments are known as parameterized constructors.

Should a main method be compulsorily declared in all java classes?
Ans: No not required. main method should be defined only if the source class is a java application.

What is the return type of the main method?
Ans: Main method doesn’t return anything hence declared void.

What is  Heap Memory 

Ans: Heap memory is used by java runtime to allocate memory to Objects and JRE classes. Whenever we create any object, it’s always created in the Heap space. Any object created in the heap space has global access and can be referenced from anywhere of the application.

Java Stack Memory

Ans: Java Stack memory is used for execution of a thread. They contain method specific values that are short-lived and references to other objects in the heap that are getting referred from the method. Stack memory is always referenced in LIFO (Last-In-First-Out) order.

Why is the main method declared static?
Ans: main method is called by the JVM even before the instantiation of the class hence it is declared as static.

What is the arguement of main method?
Ans: main method accepts an array of String object as arguement.

Does constructor return any value?

Ans: yes, that is current instance (You cannot use return type yet it returns a value)

What is Type casting in Java?

Ans: To create a conversion between two incompatible types, we must use a cast. There are two types of casting in java: automatic casting (done automatically) and explicit casting (done by programmer).

Can you make a constructor final?

Ans: No, constructor can’t be final.

Is constructor inherited?

Ans: No, constructor is not inherited.

Can a main method be overloaded? 
Ans: You can have any number of main methods with different method signature and implementation in the class.

Can a main method be declared final? 
Ans: Any inheriting class will not be able to have it’s own default main method.

Does the order of public and static declaration matter in main method?
Ans: No it doesn’t matter but void should always come before main().

Why main method is static?

Ans: because object is not required to call static method if It were non-static method,jvm creats object first then call main() method that will lead to the problem of extra memory allocation.

What is a package?
Ans: Package is a collection of related classes and interfaces. package declaration should be first statement in a java class.

What is Function Overriding and Overloading in Java ?

Ans: Method overloading in Java occurs when two or more methods in the same class have the exact same name, but different parameters. On the other hand, method overriding is defined  when a parent class have the same method define in child class. Overridden methods must have the same name, argument , and return type.

Can a class be declared as protected?
Ans: A class can’t be declared as protected. only methods can be declared as protected.

What is static and dynamic binding?

Ans: A binding that happens at compile time is known as static binding while binding that happens  at runtime is known as dynamic binding.

What is the purpose of declaring a variable as final? 
 Ans: A final variable’s value can’t be changed. final variables should be initialized before using them.

HashSet vs TreeSet

Difference between HashSet and TreeSet

HashSet

TreeSet

1) HashSet stores the element in random order .S0 there is no guarantee that the elements are print in which they are insert into HashSet . TreeSet elements are sorted in ascending order by default.
2) HashSet can store null object. TreeSet does not store null object. If one try to store null object in TreeSet object , it will throw Null Pointer Exception.
3)HashSet is much faster than TreeSet .  TreeSet is slower than HashSet.
4)HashSet is backed by HashMap.  TreeSet is backed by TreeMap .
5)HashSet offers constant time performance for the basic operations (add, remove, contains and size). TreeSet offers log(n) time cost for such operations.
6) HashSet uses equals() method for comparison .  TreeSet uses compareTo() method for maintaining ordering .


Similarities between HashSet and TreeSet

1) Both HashSet and TreeSet does not store duplicate elements.

2) Both of these classes are non-synchronized that means they are not thread-safe or multiple threads are access at same time .

3)Both HashSet and TreeSet uses shallow copy technique to create a clone of  their objects .

ArrayList vs Array

Difference between Array and ArrayList

  • Arrays are created of fix size where  ArrayList is dynamic in nature and can vary its length.so Array is a fixed length data structure while ArrayList is a variable length Collection class
  •  Size of Array cannot be incremented or decremented. But Size of ArrayList can be incremented or decremented as need.
  • Once the Array is created elements cannot be added or deleted from it. But with ArrayList the elements can be added and deleted at runtime
  • Elements of Array  retrieved with for loop But Elements of ArrayList Can be retrieved with for loop and iterators both.
  • create ArrayList

    ArrayList list = new ArrayList();
      list.add(1);
      list.add(2);
      list.remove(3) // remove the element from the 1st location.

    create Array

    int[] intArray= new  int[3]; // one dimensional array
    int[] intArray= new  int[3][2]; // two dimensional array
    int[] intArray= new  int[3][2][1]; // three dimensional array
  • ArrayList is one dimensional but array can be multidimensional.
    int[][] intArray= new  int[3][2]; // 2 dimensional array
  • Array can contain objects of a single data type or class. ArrayList if not used with generic can contain objects of different classes.
  • ArrayList can not contains primitive data types (like int , float , double) it can only contains Object while Array can contain both primitive data types as well as objects.
  • We can insert elements into the Arraylist object using the add() method while  in array we insert elements using the assignment operator.

           In case of Array add element

               Integer[] intarray= new Integer[3]; //create array of size 3
               intarray[0]= new Integer(1);

                intarray[1]= new Integer(3);

             In case of ArrayList add element

               ArrayList  al= new ArrayList();
               al.add(1);

               al.add(2);


ArrayList vs HashMap

Difference between ArrayList and HashMap in Java

ArrayList HashMap
1) ArrayList implements List Interface . HashMap is an implementation of Map interface.
2)ArrayList only stores value or element. HashMap stores  key & value pairs.
3) ArrayList maintains insertion order of the elements. HashMap doesn’t  maintains the insertion order of the elements.
4)ArrayList can contain duplicate elements. HashMap doesn’t contain duplicate keys but contain duplicate values.
5) ArrayList get(index) method always gives an O(1) performance.

HashMap get(key)method can be O(1) in the best case and O(n) in the worst case.

6) ArrayList can have any number of null elements. HashMap allows one null key and multiple number of null values.
7) ArrayList is a collection of objects similar to Vector HashMap is a collection of key and value pairs similar to Hashtable.


Similarity between ArrayList and HashMap

1) Both ArrayList and HashMap are not synchronized, which means multiple threads can work on ArrayList and HashMap at the same time..

2) Both ArrayList and HashMap Iterator are fail-fast, they will throw ConcurrentModificationException .

3) Both ArrayList and HashMap allows null.
4) ArrayList contain duplicate elements and HashMap contain duplicate values.
5) Both ArrayList and HashMap can be traversed through Iterator .

HashMap vs HashSet

Difference between HashSet and HashMap

HashMap HashSet
1)HashMap class implements the Map interface. HashSet class implements the Set interface.
2) HashMap is not part of collection inteface.  HashSet is part of Collection interface.
3) HashMap are use to store key & value pairs. HashSetare use to store only value or element.
4) HashMap does not allow duplicate keys however it allows to have duplicate values. HashSet does not allow duplicate elements that means you can not store duplicate values in HashSet.
5) HashMap allow single null key and any number of null values. HashSet allows  single null value.
6) we use put() method to insert key and value into HashMap . we use add() method to put elements into HashSet Set .


Similarities between HashSet and HashMap

  1. Both HashMap and HashSet are hash based collection in Java.
  2.  Both HashMap and HashSet are not synchronized which means they are not suitable for thread-safe operations unitl unless synchronized explicitly. This is how you can synchronize them explicitly:
    HashSet:

          Set s = Collections.synchronizedSet(new HashSet(…));

           HashMap:

           Map m = Collections.synchronizedMap(new HashMap(…));

  1. Both HashMap and HashSet does not guarantee that the order will remain constant over time.
  2.  If you look at the source code of HashSet then you may find that it is backed up by a HashMap. So basically it internally uses a HashMap for all of its operations.
  3. Both HashMap and HashSet provided constant time performance for basic operations like put(), get() etc.
    Both HashSet and HashMap allows null values.

HashSet example

import java.util.HashSet;
class HashSetDemo{ 
  public static void main(String[] args) {
     // Create a HashSet
     HashSet<String> hset = new HashSet<String>();
 
     //add elements to HashSet
     hset.add("A");
     hset.add("B");
     hset.add("C");
     hset.add("D");
 
     // Displaying HashSet elements
  
     for(String temp : hset){
        System.out.println(temp);
     }
  }
}

Output:


A
B
C
D

HashMap example

import java.util.HashMap;
class HashMapDemo{ 
  public static void main(String[] args) {
     // Create a HashMap
     HashMap<Integer, String> hmap = new HashMap<Integer, String>();
 
     //add elements to HashMap
     hmap.put(1, "A");
     hmap.put(2, "B");
     hmap.put(3, "C");
     hmap.put(4, "D");
 
     // Displaying HashMap elements
     System.out.println(hmap);
  }
}

Output:

 {1=A, 2=B, 3=C, 4=D}

HashMap vs Hashtable

Difference between HashMap and Hashtable

HashMap Hashtable
1) HashMap is non synchronized. which means multiple threads can work on HashMap at the same time. Hashtable is synchronized. which means only one threads can work on HashMap at the same time.
2) HashMap allows one null key and multiple null values. Hashtable doesn’t allow null keys and null values.
3) HashMap class  is  introduced in JDK 1.2. Hashtable is a legacy class.
4)Hashmap is much faster and uses less memory than Hashtable as former is unsynchronized. Hashtable is slow.
5) HashMap can be synchronized by

Map m = Collections.synchronizedMap(hashMap);

Hashtable is internally synchronized and can’t be unsynchronized.
6) Hashmap object values are iterated by using iterator Hashtable object values are iterated Enumerator as well as Iterator.
7) Iterator in HashMap is fail-fast. Enumerator in Hashtable is not fail-fast.
8) HashMap inherits AbstractMap class. Hashtable inherits Dictionary class.


Similarities Between HashMap and Hashtable

  1. Both HashMap and Hashtable implements Map interface .
  2. Both HashMap and Hashtable  does not guarantee that  the order of the map will remain constant over time.
  3. Both HashMap and Hashtable provides constant time performance for put and get methods .
  4. Both HashMap and Hashtable works on the Principle of Hashing.

ArrayList Vs LinkedList

Difference between ArrayList and LinkedList


ArrayList LinkedList
1) ArrayList internally uses dynamic array to store the elements. LinkedList internally uses doubly linked list to store the elements.
2) Manipulation with ArrayList is slow because it internally uses array. If any element is removed from the array, all the bits are shifted in memory. Manipulation with LinkedList is faster than ArrayList because it uses doubly linked list so no bit shifting is required in memory.
3) ArrayList search operation is pretty fast compared to the LinkedList search operation. ArrayList gives the performance of O(1) LinkedList search operation is pretty slow compared to the ArrayList search operation. LinkedList gives the performance of O(n)
4) ArrayList element deletion is slow compared to LinkedList .ArrayList deletion operation gives O(n) in worst case (while removing first element) and O(1) in best case (While removing last element). LinkedList element deletion is faster compared to ArrayList.LinkedList deletion operation gives O(1) performance
5) ArrayList add method gives O(n)performance LinkedList add method gives O(1)performance
6)The memory consumption is low in case of ArrayList because ArrayList maintains indexes and element data The memory consumption is high in case of LinkedList because  LinkedList maintains element data and two pointers for neighbor nodes
7) ArrayList is better for storing and accessing data. LinkedList is better for manipulating data.


Similarities between ArrayList and LinkedList

  1. Both ArrayList and LinkedList are implementation of List interface.
  2.  Both maintain the elements insertion order means display element in  the same order in which the elements are inserted into the List.
  3. Both ArrayList and LinkedList are non-synchronized and can be made synchronized explicitly by using Collections.synchronizedListmethod.

ArrayList Vs Vector

Difference between ArrayList and Vector

ArrayList Vector
1) ArrayList is non-synchronized which means multiple threads can work on ArrayList at the same time. 1) Vector is  synchronized which means multiple threads can’t work on vector at the same time.
2) ArrayList increments (3/2 +1)of current array size(almost 50% of current capacity) if total  number of element exceeds than its capacity. 2) Vector increments 100% means doubles the array size if total number of element exceeds than its capacity.
3) ArrayList  is introduced in JDK 1.2.so it is not a legacy class. 3) Vector is a legacy class.
4) ArrayList gives better performance as it is non-synchronized. 4) Vector operations gives poor performance as they are synchronized( thread-safe).
5) ArrayList uses Iterator interface to traverse the elements. 5) Vector uses Enumeration as well as Iterator interface to traverse the elements.


Similarities between ArrayList and Vector

  1. Both Vector and ArrayList use growable array data structure.
  2.  Both are ordered collection classes as they maintain the elements insertion order.
  3. Both Vector and ArrayList allows duplicate and null values.
  4.  Both grows and shrinks automatically when number of element exceeds than its capacity.


ArrayList Example

import java.util.*;
public class MyArrayList {
   public static void main(String args[]) {
      // ArrayList declaration
      ArrayList<Integer> al =new ArrayList<Integer>();
      // Adding elements to the Arraylist
      al.add(1);
      al.add(2);
      al.add(3);
      al.add(1);
      al.add(5);
      //Displaying Arraylist elements
      System.out.println(al);
    }
}

Output:

[1, 2, 3, 1, 5]


Vector Example

import java.util.*;
public class MyVector {
   public static void main(String args[]) {
      // Vector declaration
      Vector<Integer> vt =new Vector<Integer>();
      // Adding elements to the Vector
      vt.add(1);
      vt.add(10);
      vt.add(30);
      vt.add(40);
      vt.add(10);
      //Displaying Vector elements
      System.out.println(vt);
    }
}

Output:

[1, 10, 30, 40, 10]
 

Java -LinkedHashMap class

  •  LinkedHashMap contains values based on the key. It implements the Map interface and extends HashMap class.
  • LinkedHashMap is a Hash table and linked list implementation of the Map interface
  • LinkedHashMap contains only unique elements.
  • LinkedHashMap may have one null key and multiple null values.
  • LinkedHashMap is same as HashMap instead maintains insertion order.
  • LinkedHashMap maintains a doubly-linked list running through all of its entries


Example of LinkedHashMap

  1. import java.util.*;
  2. class LinkedHashMapDemo

    {

  3.  public static void main(String args[]){
  4.   LinkedHashMap<Integer,String> hm=new LinkedHashMap<Integer,String>();
  5.   hm.put(100,“A”);
  6.   hm.put(101,“B”);
  7.   hm.put(102,“C”);
  8. for(Map.Entry m:hm.entrySet()){
  9.    System.out.println(m.getKey()+” “+m.getValue());
  10.   }
  11. }
  12. Output:
       100 A
       101 B
       103 C

Another Example of LinkedHashMap

import java.util.LinkedHashMap;
import java.util.Set;
import java.util.Iterator;
import java.util.Map;
public class LinkedHashMapDemo1 {
    public static void main(String args[]) {
         // HashMap Declaration
         LinkedHashMap<Integer, String> lhm = 
                 new LinkedHashMap<Integer, String>();

         //Adding elements to LinkedHashMap
         lhm.put(22, "A");
         lhm.put(33, "B");
         lhm.put(1, "C");
         lhm.put(2, "D");
         lhm.put(100, "E");

         // Generating a Set of entries
         Set set = lhm.entrySet();

         // Displaying elements of LinkedHashMap
         Iterator iterator = set.iterator();
         while(iterator.hasNext()) {
            Map.Entry me = (Map.Entry)iterator.next();
            System.out.print("Key is: "+ me.getKey() + 
                    "& Value is: "+me.getValue()+"\n");
         }
    }
}

Output:

Key is: 22& Value is: A
Key is: 33& Value is: B
Key is: 1& Value is: C
Key is: 2& Value is: D
Key is: 100& Value is: E
 

Java -TreeMap class

  • TreeMap contains values based on the key. It implements the NavigableMap interface and extends AbstractMap class.
  • TreeMap contains only unique elements.
  • TreeMap cannot have null key but can have multiple null values.
  • TreeMap is same as HashMap instead maintains ascending order.
  • TreeMap is unsynchronized collection class which means it is not suitable for thread-safe operations until unless synchronized explicitly.

TreeMap Example

  1. import java.util.*;
  2. class TreeMapDemo
    {
  3.  public static void main(String args[]){
  4.   TreeMap<Integer,String> tm=new TreeMap<Integer,String>();
  5.   tm.put(100,“A”);
  6.   tm.put(102,“B”);
  7.   tm.put(101,“C”);
  8.   tm.put(103,“D”);
  9.   for(Map.Entry hm:tm.entrySet()){
  10.    System.out.println(hm.getKey()+” “+hm.getValue());
  11.   }
  12.  }
  13. }
    Output:
           100 A
           101 C
           102 B
           103 D

Another TreeMap Example

import java.util.TreeMap;
import java.util.Set;
import java.util.Iterator;
import java.util.Map;

public class TreeMapDemo1
 {

   public static void main(String args[]) {

      /* This is how to declare TreeMap */
      TreeMap<Integer, String> tmp = 
             new TreeMap<Integer, String>();

      /*Adding elements to TreeMap*/
      tmp.put(1, "A");
      tmp.put(2, "B");
      tmp.put(5, "C");
      tmp.put(3, "D");
      tmp.put(4, "E");

      /* Display content using Iterator*/
      Set set = tmp.entrySet();
      Iterator iterator = set.iterator();
      while(iterator.hasNext()) {
         Map.Entry m = (Map.Entry)iterator.next();
         System.out.print("key is: "+ m.getKey() + " & Value is: ");
         System.out.println(m.getValue());
      }

   }
}

Output:

key is: 1 & Value is: A
key is: 2 & Value is: B
key is: 3 & Value is: D
key is: 4 & Value is: E
key is: 5 & Value is: C
 

Java – HashMap Class

  •  HashMap contains values based on the key. It implements the Map interface and extends AbstractMap class.
  • HashMap  is used for storing Key & value pairs.
  • HashMap contains only unique elements.
  • HashMap may have one null key and multiple null values.
  • HashMap doesn’t maintains insertion order.
  • HashMap is similar to the Hashtable class except that it is unsynchronized and permits null values and null key.
  • HashMap maintains key and value pairs and often denoted as HashMap<Key, Value> .


Constructors of HashMap class as shown below :

  • HashMap (): It is a default constructors hashmap.
  • HashMap (Map m): It initializes the hash map by using the elements of m.
  • HashMap (int capacity): It initializes the capacity of the hash map to capacity. The default initial capacity of HashMap will be 16 and the load factor will be 0.75.Load factor represents at what level HashMap should be increase your capacity .
  • HashMap (int capacity, float fillRatio): it initializes capacity and fillRatio to grow the capacity after certain elements inserted.

HashMap Example in Java:

  1. import java.util.*;
  2. class HapMapDemo{
  3.  public static void main(String args[]){
  4.   HashMap<Integer,String> hm=new HashMap<Integer,String>();
  5.   hm.put(100,“A”);
  6.   hm.put(101,“B”);
  7.   hm.put(102,“C”);
  8.   for(Map.Entry mentry : hm.entrySet()){
  9.    System.out.println(mentry .getKey()+” “+mentry .getValue());
  10.   }
  11.  }
  12. }
Output:
       102 C
       100 A
       101 B

HashMap Class Methods

  1. void clear(): It removes all the key and value pairs from the specified Map.
  2. Object clone(): It returns a copy of all the mappings of a map and used for cloning them into another map.
  3. boolean containsKey(Object key): It is a boolean function which returns true or false based on whether the specified key is found in the map.
  4. boolean containsValue(Object Value): Similar to containsKey() method, however it looks for the specified value instead of key.
  5. Value get(Object key): It returns the value for the specified key.
  6. boolean isEmpty(): It checks whether the map is empty. If there are no key-value mapping present in the map then this function returns true else false.
  7. Set keySet(): It returns the Set of the keys fetched from the map.
  8. value put(Key k, Value v): Inserts key value mapping into the map. Used in the above example.
  9. int size(): Returns the size of the map – Number of key-value mappings.
  10. Collection values(): It returns a collection of values of map.
  11. Value remove(Object key): It removes the key-value pair for the specified key. Used in the above example.
  12. void putAll(Map m): Copies all the elements of a map to the another specified map.


Another HashMap Example in Java:

import java.util.HashMap;
import java.util.Map;
import java.util.Iterator;
import java.util.Set;
public class HashMapDemo1 {

   public static void main(String args[]) {

      // Declare HashMap 
      HashMap<Integer, String> hmap = new HashMap<Integer, String>();

      // Adding elements to HashMap
      hmap.put(11, "A");
      hmap.put(20, "B");
      hmap.put(17, "C");
      hmap.put(10, "D");
      hmap.put(31, "E");

      // Display element using Iterator 
      Set set = hmap.entrySet();
      Iterator iterator = set.iterator();
      while(iterator.hasNext()) {
         Map.Entry mhm = (Map.Entry)iterator.next();
         System.out.print("key = "+ mhm.getKey() + " & Value = "+mhm.getValue());
        
      }

      // Get values based on key
      String var= hmap.get(20);
      System.out.println("Value at index 2 is: "+var);

      // Remove values based on key
      hmap.remove(31);
      System.out.println("Map key and values after removal:");
      Set set2 = hmap.entrySet();
      Iterator iterator2 = set2.iterator();
      while(iterator2.hasNext()) {
          Map.Entry mentry2 = (Map.Entry)iterator2.next();
          System.out.print("Key = "+mentry2.getKey() + " & Value = "+mentry2.getValue());
        
       }

   }
}

Output:

key = 10 & Value = D
key = 20 & Value = B
key = 31 & Value = E
key = 17 & Value = C
key = 11 & Value = A
Value at index 2 is: B
Map key and values after removal:
Key = 10 & Value = D
Key = 20 & Value = B
Key = 17 & Value = C
Key = 11 & Value = A

Java -TreeSet class

  • TreeSet contains unique elements only like HashSet. The TreeSet class implements .NavigableSet interface that extends the SortedSet interface.
  • TreeSet sorts the elements in the ascending order.
  • TreeSet allows null element.
  • TreeSet class is  not synchronized.
  • it can be synchronized explicitly like this: SortedSet s = Collections.synchronizedSortedSet(new TreeSet(...));


class TreeSet <T>

We can create TreeSet for storing String type elements as follows:

TreeSet <String> hs=new TreeSet <String> ();

We can create TreeSet for storing Integer type elements as follows:

TreeSet <Integer> hs=new TreeSet <Integer> ();

TreeSet Example:

  1. import java.util.*;
  2. class TreeSetDemo
    {
  3.  public static void main(String args[]){
  4.   TreeSet<String> ts=new TreeSet<String>();
  5.   ts.add(“C”);
  6.   ts.add(“B”);
  7.   ts.add(“D”);
  8.   ts.add(“A”);
  9.   Iterator<String> itr=ts.iterator();
  10.   while(itr.hasNext()){
  11.    System.out.println(itr.next());
  12.   }
  13.  }
  14. }
Output:
       A
       B
       C
       D

Another TreeSet Example:

import java.util.TreeSet;
public class TreeSetDemo1 {
     public static void main(String args[]) {
         // TreeSet declaration of String Type
         TreeSet<String> ts = new TreeSet<String>();

         // Adding elements to TreeSet of type String
         ts.add("ABC");
         ts.add("String");
         ts.add("School");
         ts.add("Pen");
         ts.add("Ink");
         ts.add("Book");

         //Displaying element of TreeSet
         System.out.println(ts);

         // TreeSet of Integer Type
         TreeSet<Integer> ts2 = new TreeSet<Integer>();

         // Adding elements to TreeSet of type <Integer>
         ts2.add(80);
         ts2.add(70);
         ts2.add(10);
         ts2.add(0);
         ts2.add(30);
         ts2.add(22);
         System.out.println(ts2);
    }
 }
output
[ABC, Book, Ink, Pen, School, String]
[0, 10, 22, 30, 70, 80]
 

Java -LinkedHashSet class

  • LinkedHashSet contains unique elements only like HashSet. It extends HashSet class and implements Set interface.
  • LinkedHashSet maintains the insertion order. Elements gets sorted in the same sequence in which they have been added to the Set.


class LinkedHashSet <T>

We can create LinkedHashSet for storing String type elements as follows:

LinkedHashSet <String> hs=new LinkedHashSet <String> ();

We can create LinkedHashSet for storing Integer type elements as follows:

LinkedHashSet <Integer> hs=new LinkedHashSet <Integer> ();

Example of LinkedHashSet:

  1. import java.util.*;
  2. class LinkedHashSetDemo
    {
  3.  public static void main(String args[]){
  4.   LinkedHashSet<String> lhs=new LinkedHashSet<String>();
  5.   lhs.add(“A”);
  6.   lhs.add(“B”);
  7.   lhs.add(“A”);
  8.   lhs.add(“C”);
  9.   Iterator<String> itr=lhs.iterator();
  10.   while(itr.hasNext()){
  11.    System.out.println(itr.next());
  12.   }
  13.  }
  14. }
Output:
       A
       B
       C

Another Example of LinkedHashSet:

import java.util.LinkedHashSet;
public class LinkedHashSetDemo1 {
     public static void main(String args[]) {
         // LinkedHashSet of String Type
         LinkedHashSet<String> lhs = new LinkedHashSet<String>();

         // Adding elements to the LinkedHashSet of type <String>
         lhs.add("A");
         lhs.add("B");
         lhs.add("C");
         lhs.add("D");
         lhs.add("E");
         lhs.add("F");
         System.out.println(lhs);

         // LinkedHashSet declaration of Integer Type
         LinkedHashSet<Integer> lhs2 = new LinkedHashSet<Integer>();

         // Adding elements to the LinkedHashSet of type<Integer>
         lhs2.add(10);
         lhs2.add(20);
         lhs2.add(30);
         lhs2.add(40);
         lhs2.add(50);
         lhs2.add(60);
         System.out.println(lhs2);
    }
}

Output:

[A, B, C, D, E, F]
[10, 20, 30, 40, 50, 60]
 
declaration

Java -HashSet class

  • This class implements the Set interface.
  • HashSet  uses hashtable to store the elements.
  • HashSet doesn’t maintain any order, the elements would be returned in any random order.
  • HashSet  contains unique elements only.
  • HashSet doesn’t allow duplicates. If you try to add a duplicate element in HashSet, the old value would be overwritten.
  • HashSet allows null values however if you insert more than one nulls it would still return only one null value.
  • HashSet is non-synchronized.


class HashSet<T>

We can create HashSet for storing String type elements as follows:

HashSet<String> hs=new HashSet<String> ();

We can create HashSet for storing Integer type elements as follows:

HashSet<Integer> hs=new HashSet<Integer> ();


HashSet contains the following constructors:

  • HashSet (): It is constructors default hash set.
  • HashSet (Collection c): It initializes hash set by using elements of c.
  • HashSet (int capacity): It creates HashSet with initial capacity , default capacity  of HashSet is 16.
  • HashSet (int capacity, float fillRatio): it initializes capacity and fillRatio to grow the capacity after certain elements inserted.


HashSet Example

  1. import java.util.*;
  2. class MyHashSetDeo{
  3.  public static void main(String args[]){
  4.   HashSet<String> hs=new HashSet<String>();
  5.   hs.add(“A”);
  6.   hs.add(“B”);
  7.   hs.add(“C”);
  8.   hs.add(“D”);
  9.   Iterator<String> itr=hs.iterator();
  10.   while(itr.hasNext()){
  11.    System.out.println(itr.next());
  12.   }
  13.  }
  14. }
Output:
       A
       B
       C
       D

HashSet Methods:

  1. boolean add(Element  e): It adds the element e to the list.
  2. void clear(): It removes all the elements from the list.
  3. Object clone(): This method returns a shallow copy of the HashSet.
  4. boolean contains(Object o): It checks whether the specified Object o is present in the list or not. If the object has been found it returns true else false.
  5. boolean isEmpty(): Returns true if there is no element present in the Set.
  6. int size(): It gives the number of elements of a Set.
  7. boolean(Object o): It removes the specified Object o from the Set.

HashSet Example

import java.util.HashSet;
public class MyHashSetDemo1 {
   public static void main(String args[]) {
      // HashSet declaration
      HashSet<String> hset =new HashSet<String>();
      // Adding elements to the HashSet
      hset.add("A");
      hset.add("M");
      hset.add("G");
      hset.add("O");
      hset.add("B");
      //Addition of duplicate elements
      hset.add("A");
      hset.add("M");
      //Addition of null values
      hset.add(null);
      hset.add(null);

      //Displaying HashSet elements
      System.out.println(hset);
    }
}

Output:

[null, M, G, A, O, B]
 

Java – Vector Class

  • The Vector class implements a growable array of objects. Similar to array.
  • It is similar to ArrayList, but with two differences:
  • Vector is synchronized.
  • Vector contains many legacy methods that are not part of the collections framework.
  • The elements of Vector can be accessed using an integer index.
  • The size of a Vector can grow or shrink as needed to accommodate adding and removing items after the Vector has been created.
  • Vector is synchronized which means it is suitable for thread-safe operations
  • Vector implements List Interface. Like ArrayList it also maintains insertion order
  • it is synchronized and due to which it gives poor performance in searching, adding, delete and update of its elements.


class Vector <T>

We can create Vector for storing String type elements as follows:

Vector <String> hs=new Vector <String> ();

We can create Vector for storing Integer type elements as follows:

Vector <Integer> hs=new Vector <Integer> ();


Constructors of Vector class as show below:

  • Vector( ): This constructor creates a default vector, which has an initial size of 10
  • Vector(int size): This constructor is use to create vector of specific  size .They are accept an argument that equals to the required size.
  • Vector(int size, int incr): This constructor creates a vector whose initial capacity is specified by size and whose increment is specified by incr. The increment specifies the number of elements to allocate each time that a vector is resized upward
  • Vector(Collection c) :creates a vector that contains the elements of collection c


Methods of Vector Class:

  1. void addElement(Object element): It inserts the element at the end of the Vector.
  2. int capacity(): This method returns the current capacity of the vector.
  3. int size(): It returns the current size of the vector.
  4. void setSize(int size): It changes the existing size with the specified size.
  5. boolean contains(Object element): This method checks whether the specified element is present in the Vector. If the element is been found it returns true else false.
  6. boolean containsAll(Collection c): It returns true if all the elements of collection c are present in the Vector.
  7. Object elementAt(int index): It returns the element present at the specified location in Vector.
  8. Object firstElement(): It is used for getting the first element of the vector.
  9. Object lastElement(): Returns the last element of the array.
  10. Object get(int index): Returns the element at the specified index.
  11. boolean isEmpty(): This method returns true if Vector doesn’t have any element.
  12. boolean removeElement(Object element): Removes the specifed element from vector.
  13. boolean removeAll(Collection c): It Removes all those elements from vector which are present in the Collection c.
  14. void setElementAt(Object element, int index): It updates the element of specifed index with the given element.


 Example of Vector in Java:


import java.util.Iterator;


import java.util.Vector;


public class MyVectorDemo {


 public static void main(String a[]){


 Vector<String> vct = new Vector<String>()


//adding elements to the end


vct.add("A");


vct.add("B");


vct.add("C");


vct.add("D");


Iterator<String> itr = vct.iterator();


 while(itr.hasNext()){


System.out.println(itr.next());


}


}}

Output:

A
B
C
D

Another example of Vector in Java:

import java.util.Vector;
 
public class MyVectorOperations {
 
    public static void main(String a[]){
        Vector<String> vct = new Vector<String>();
        //adding elements to the end
        vct.add("A");
        vct.add("B");
        vct.add("C");
        System.out.println(vct);
        //adding element at specified index
        vct.add(2,"D");
        System.out.println(vct);
        //getting elements by index
        System.out.println("Element at index 3 is: "+vct.get(3));
        //getting first element
        System.out.println("The first element of this vector is: "+vct.firstElement());
        //getting last element
        System.out.println("The last element of this vector is: "+vct.lastElement());
        //check vector is empty or not
        System.out.println(" vector empty? "+vct.isEmpty());
    }
}

Output:

[A, B, C]
[A, B, D, C]
Element at index 3 is: C
The first element of this vector is: A
The last element of this vector is: C
vector empty? false


Java -LinkedList class

  • Java LinkedList class uses doubly linked list to store the elements. It extends the AbstractList class and implements List and Deque interfaces.
  • LinkedList is a doubly-linked list implementation of the List and Deque interfaces
  • Java LinkedList class can contain duplicate elements.
  • Java LinkedList class maintains insertion order.
  • Java LinkedList class is non synchronized.
  • In Java LinkedList class, manipulation is fast because no shifting needs to be occurred.
  • It doesn’t support random access for retrieving values.
  • It can be used as list, stack or queue.


class LinkedList<E>

We can create LinkedList for storing String type elements as follows:

LinkedList<String> ll=new LinkedList<String> () ;

We can create LinkedList for Integer String type elements as follows:

LinkedList<Integer > ll=new LinkedList<Integer > () ;

Constructors of LinkedList  class as show below:

  • LinkedList( )  : This constructor builds an empty linked list.
  • LnkedList(Collection c) :This constructor builds a linked list that is initialized with the elements of the collection c.


Methods of LinkedList class:

LinkedList<String> llistobj  = new LinkedList<String>();

1) boolean add(Object item): It appends the specified element to the end of this list.

llistobj.add("A");

2) void add(int index, Object item): Inserts the specified element at the specified position(index-1) in this list.

llistobj.add(2, "B");

3) boolean addAll(Collection c): Appends all of the elements in the specified collection to the end of this list. Consider the below example –

LinkedList<String> llistobj = new LinkedList<String>();
ArrayList<String> arraylistobj= new ArrayList<String>();
arraylistobj.add("A");
arraylistobj.add("B");
llistobj.addAll(arraylistobj);

Add all the elements of ArrayList to the LinkedList.

4) boolean addAll(int index, Collection c):Inserts all of the elements in the specified collection at the specified position(index-1) into this list.

llistobj.add(2, arraylist);

5) void addFirst(Object item): It adds the item (or element) at the first position in the list.

llistobj.addFirst("A");

6) void addLast(Object item): Appends the specified element to the end of this list.

llistobj.addLast("A");

7) void clear(): It removes all the elements of a list.

llistobj.clear();


8) boolean contains(Object item): Returns true if this list contains the specified element otherwise false.

boolean var = llistobj.contains("hello");

9) Object clone(): It returns the copy of the list.

For e.g. My linkedList has five items: A, B, C ,D.and E

Object obj= llistobj.clone();
 System.out.println(obj);

Output: The output of above code would be:

[A, B, C, D,E]

10) int indexOf(Object item): Returns the index of the first occurrence of the specified element in this list, or return  -1 if this list does not contain the element.

llistobj.indexOf("hello");

11) int lastIndexOf(Object item): It returns the index of last occurrence of the specified element in this list, or return  -1 if this list does not contain the element .

int index= llistobj.lastIndexOf("hello);

12) Object get(int index): It returns the item of the specified index from the list.

Object var = llistobj.get(2);

13) Object getFirst(): Returns the first element in this list. Throws NoSuchElementException if this list is empty.

Object var = llistobj.getFirst();

14) Object getLast(): Returns the last element in this list. Throws NoSuchElementException if this list is empty.

Object var= llistobj.getLast();


15) Object poll(): It returns and removes the first item of the list.

Object obj = llistobj.poll();

16) Object pollFirst(): Retrieves and removes the first element of this list, or returns null if this list is empty.

Object obj = llistobj.pollFirst();

17) Object pollLast(): Retrieves and removes the last element of this list, or returns null if this list is empty.

Object obj = llistobj.pollLast();

18) Object remove(): It removes the first element of the list.

llistobj.remove();

19) Object remove(int index): It removes the item from the list which is present at the specified index.

llistobj.remove(2);

20) Object remove(Object obj): Removes the first occurrence of the specified element from this list, if it is present.

llistobj.remove("A");

21) Object removeFirst(): It removes the first element from the list.

llistobj.removeFirst();

22) Object removeLast(): It removes the last element of the list.

llistobj.removeLast();

23) Object removeFirstOccurrence(Object item): It removes the first occurrence of the specified item.

llistobj.removeFirstOccurrence("A");

24) Object removeLastOccurrence(Object item): It removes the last occurrence of the given element.

llistobj.removeLastOccurrence("A);

25) Object set(int index, Object item): Replaces the element at the specified index in this list with the specified element. Throws IndexOutOfBoundsException if the specified index is is out of range.

llistobj.set(1, "A");

26) int size(): It returns the number of elements of the list.

llistobj.size();


Example of LinkedList in Java

import java.util.Iterator;
import java.util.LinkedList;
 
public class MyLinkedListDemo {
 
    public static void main(String a[]){
        LinkedList<String> arrl = new LinkedList<String>();
        //adding elements to the end
        arrl.add("A");
        arrl.add("B");
        arrl.add("C");
        arrl.add("D");
        Iterator<String> itr = arrl.iterator();
        while(itr.hasNext()){
            System.out.println(itr.next());
        }
    }
}

Output:

A
B
C
D

Download this example from Here

 Another Example of LinkedList in Java

Example for copying  ArrayList into at the end  of LinkedList.

import java.util.ArrayList;
import java.util.LinkedList;
import java.util.List;
 
public class MyLinkedListDemo1 {
 
    public static void main(String a[]){
         
        LinkedList<String> listobj= new LinkedList<String>();
        //adding elements to the end
        arrl.add("A");
        arrl.add("B");
        arrl.add("C");
        arrl.add("D");
        System.out.println("Actual LinkedList:"+arrl);
        List<String> list = new ArrayList<String>();
        list.add("one");
        list.add("two");
        listobj.addAll(list); //copy at end of actual linkedlist
        System.out.println("After Copy LinkedList: "+listobj);
    }
}
Output:
Actual LinkedList:[A, B, C, D] 
After Copy LinkedList : [A, B, C, D, one, two] 


Download this example from Here

Java-ArrayList class

  • Java ArrayList class uses a dynamic array for storing the elements.It extends AbstractList class and implements List interface.
  • ArrayList supports dynamic array which can grow as needed.
  • Size of ArrayList can be dynamically increased or decreased.
  • Java ArrayList class can contain duplicate elements.
  • Java ArrayList class maintains insertion order of elements.
  • Java ArrayList class is non synchronized.
  • Java ArrayList allows random access because array works at the index basis.
  •  Java ArrayList class, manipulation is slow because a lot of shifting needs to be occurred if any element is removed from the array list.


class ArrayList <T>

We can create ArrayList for storing String type elements as follows:

ArrayList <String> hs=new ArrayList <String> ();

We can create ArrayList for storing Integer type elements as follows:

ArrayList <Integer> hs=new ArrayList <Integer> ();


 Constructors of ArrayList class as show below:

  • ArrayList (): It builds an empty array list.
  • ArrayList (Collection c): It builds an array list which is initialized with elements of the collection c.
  • ArrayList (int capacity): It builds arraylist which has specified initial capacity .


Methods of ArrayList Class

Method Description
void add(int position, element obj) It inserts specified element at the specified position in the ArrayList.
boolean add(element obj) It appends specified element to the end of the ArrayList.
boolean addAll(Collection c) It appends all the elements of the collection to the end of the ArrayList.
element remove(int position) It removes specified element at the specified position in the ArrayList.
boolean remove(object obj) It removes first occurrence of specified element obj from the ArrayList.
void clear() It removes all the elements from the ArrayList.
boolean contains(Object o) It returns true if ArrayList contains the specified element .
object get(int position) It returns the element at the specified position in the ArrayList.
int indexOf(Object o) It returns first occurrence of the specified element in the list or -1 if element not found in the list.
int lastIndexOf(Object o) It returns the last occurrence of the specified element in the list or -1 if the element is not found in the list.
int size() It returns the number of elements in the list.

Example of java ArrayList class


import java.util.Iterator;
import java.util.ArrayList;
 
public class MyArrayList {
 
    public static void main(String a[]){
        ArrayList<String> al = new ArrayList<String>();
        //adding elements to the end
        al.add("A");
        al.add("B");
        al.add("C");
        al.add("D");
        Iterator<String> itr = al.iterator();
        while(itr.hasNext()){
            System.out.println(itr.next());
        }
    }
}

Output:

A
B
C
D


 Download this example from Here
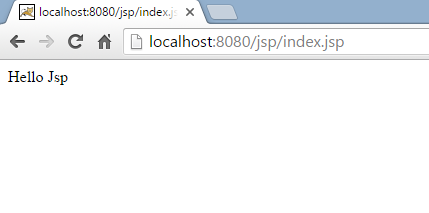

Another example of java ArrayList class


import java.util.ArrayList;
 
public class MyArrayListOperation {
 
    public static void main(String[] a){
         
        ArrayList<String> al = new ArrayList<String>();
        //add elements to the ArrayList
        al.add("C");
        al.add("C++");
        al.add("java");
        al.add("PHP");
                 System.out.println("Size of the arraylist is: "+al.size());
        System.out.println(al);
        //get elements by index
        System.out.println("Element at index 1: "+al.get(2));
        //add elements at a specific index
        al.add(2,".Net");
        System.out.println(al);
        System.out.println("Is arraylist empty? "+al.isEmpty());
        System.out.println("Index of PERL is "+al.indexOf("Java"));
        
    }
}
Output:
Size of the arraylist is: 4
[C, C++, Java, PHP]
Element at index 2: Java
[C, C++,.Net ,Java, PHP]
Is arraylist empty? false
Index of Java is 3